
1. Introduktion
This manual provides comprehensive instructions for the safe and effective operation of the KORAD KA3005P Programmable DC Power Supply. The KA3005P is a high-precision, variable, and adjustable linear power supply designed for laboratory, educational, and industrial applications. It offers stable and reliable DC power output with advanced features such as programmable control, memory storage, and multiple safety protections.

Figur 1.1: KORAD KA3005P Programmable DC Power Supply. This image shows the front and side view of the power supply unit, highlighting its compact design and the clear digital display.
2. Sikkerhedsinstruktioner
To ensure safe operation and prolong the life of your KORAD KA3005P power supply, please observe the following safety precautions:
- Always connect the power supply to a properly grounded AC outlet.
- Do not operate the unit in a wet or damp miljø.
- Ensure adequate ventilation around the unit to prevent overheating. Do not block the ventilation openings.
- Åbn ikke c'enasing af strømforsyningen. Der er ingen dele indeni, som brugeren kan servicere. Overlad al service til kvalificeret personale.
- Bekræft input voltage selector switch (110V/220V) on the rear panel is set correctly for your local power supply before connecting to AC mains.
- Disconnect the power cord before performing any maintenance or when the unit is not in use for extended periods.
- Avoid short-circuiting the output terminals. Although the unit has short-circuit protection, prolonged short circuits can cause damage.
- Use appropriate test leads and ensure they are rated for the voltage and current levels you intend to use.
3. Hvad er der i æsken
Upon unpacking your KORAD KA3005P, please verify that all the following items are included:
- 1 x KORAD KA3005P Power Supply Unit
- 1 x lysnetledning
- 1 x USB-kabel
- 1 x Set of 5 Amp Test Leads (Banana plug to Crocodile clip)
- 1 x brugermanual
- 1 x CD containing Remote Control Software
4. Produktfunktioner
The KORAD KA3005P is equipped with a range of features designed for precision and ease of use:
- High Precision Output: Provides stable and accurate 0-30V and 0-5A DC output.
- 4-cifret LED-display: Bright and clear display for precise voltage (0.001V resolution) and current (0.001A resolution) readings.
- Programmerbar kontrol: USB and RS232 ports for remote control via PC software.
- Hukommelseslagring: Four dedicated memory locations (M1-M4) to save and recall frequently used voltage og aktuelle indstillinger.
- Constant Voltage (CV) & Constant Current (CC) Modes: Automatically switches between modes to maintain stable output.
- Omfattende sikkerhedsbeskyttelse: Inkluderer overstrømsbeskyttelse (OCP), overvolumentage Protection (OVP), and Short-Circuit Protection.
- Output ON/OFF Button: Allows safe connection and disconnection of loads without powering down the unit.
- Låsefunktion: Forhindrer utilsigtede ændringer af indstillinger under drift.
- Switchable Input Voltage: Supports 110V/220V AC input, making it suitable for international use.
- Quiet Cooling Fan: Built-in variable speed fan for efficient heat dissipation and reduced operational noise.

Figur 4.1: Key features of the KORAD KA3005P. This image illustrates the power and protection mechanisms, memory settings, the bright 4-digit LED display, and the switchable power input on the rear panel.
5. Panel overview
5.1 Frontpanel

Figur 5.1: Front Panel Layout of the KORAD KA3005P. This image provides a detailed view of the front panel with numbered labels indicating the function of each control and indicator.
- Voltage-aflæsning (V): Viser output voltage i volt.
- Current Readout (A or mA): Displays the output current in Amperes eller milliamperes.
- Power Readout (Watts): Displays the calculated output power in Watts.
- Constant Voltage Mode Indicator (CV): Lyser, når enheden kører i konstant volumen.tage -tilstand.
- Constant Current Mode Indicator (CC): Lyser, når enheden kører i konstant strømtilstand.
- Memory Setting Indicator (M1-M4): Indicates which memory preset is currently active.
- Over-Current Protection Indicator (OCP): Illuminates when Over-Current Protection is active.
- Over-bindtage Protection Indicator (OVP): Illuminates when Over-Voltage Protection is active.
- Front Panel Lock Indicator (LOCK): Illuminates when the front panel controls are locked.
- Output On/Off Indicator (ON): Illuminates when the output is active.
- A/mA Button: Skifter mellem Amperage and milliAmperage display, and also serves as the Panel Lock button when held.
- OCP-knap: Activates/deactivates Over-Current Protection.
- OCP SET Button: Used to set the Over-Current Protection limit.
- OVP-knap: Activates/deactivates Over-Voltage Beskyttelse.
- OVP SET Button: Used to set the Over-Voltage Protection limit.
- ON/OFF knap: Toggles the output power ON or OFF.
- Memory Save/Recall Buttons (M1-M4): Used to save and recall voltage og aktuelle indstillinger.
- BEEP Button: Toggles the audible feedback (beeper) ON or OFF.
- SENSE Button: (Functionality may vary, typically for remote sensing).
- Setting Adjustment Dial: Rotary encoder for adjusting voltage og aktuelle værdier.
- Digit Selection Buttons (Left/Right Arrows): Used to select the digit to be adjusted by the Setting Adjustment Dial.
- Voltage/Current Adjustment Selector: Skifter mellem justering af lydstyrketage og nuværende.
- Udgangsterminaler: Red (+) and Black (-) terminals for connecting the load.
- Jordterminal (GND): Green terminal for chassis ground connection.
- Power knap: Hovedafbryder til enheden.
5.2 Bagpanel
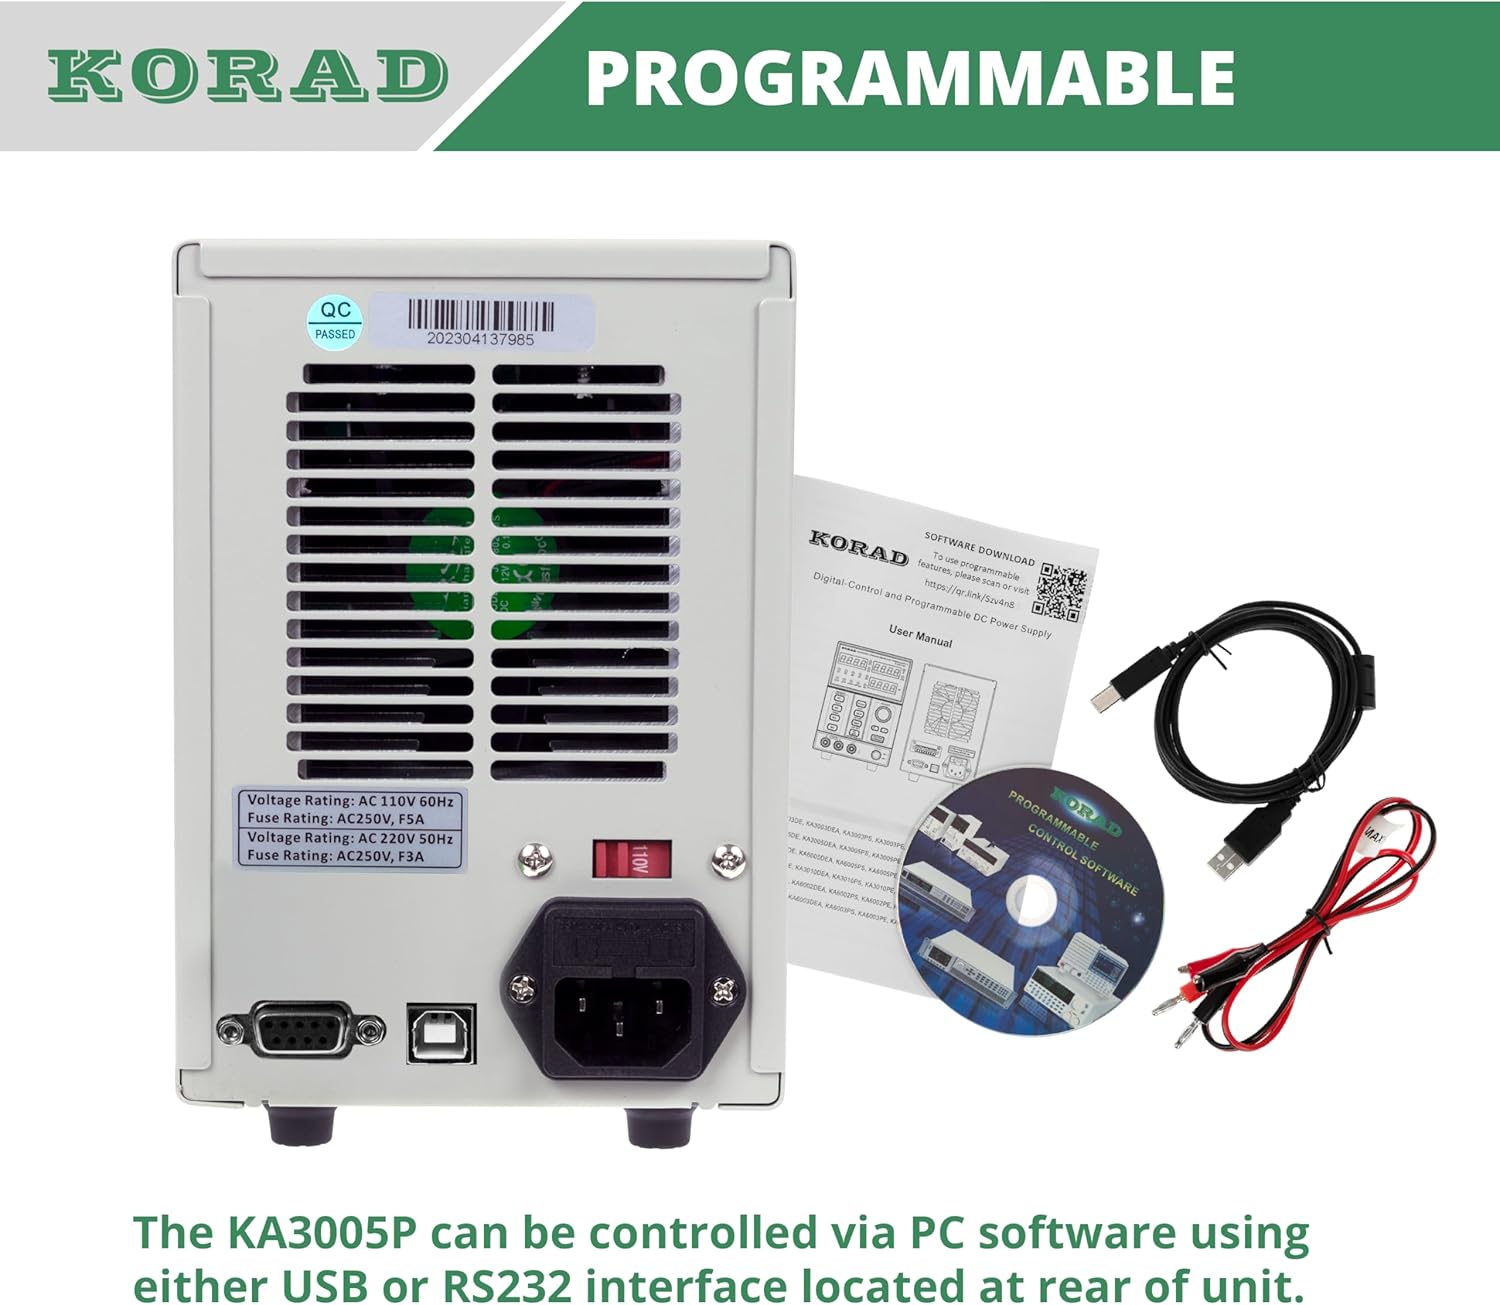
Figur 5.2: Rear Panel Layout of the KORAD KA3005P. This image displays the rear panel, showing the AC input, voltage selector, cooling fan, and communication ports.
- AC Input Socket: Til tilslutning af det medfølgende netkabel.
- Voltage Omskifter (110V/220V): Allows selection of the appropriate input voltage for din region. Ensure this is set correctly before connecting to power.
- Køleventilator: Automatically adjusts speed based on internal temperature to maintain optimal operating conditions.
- USB-port: For connecting to a computer for programmable control.
- RS232 port: For connecting to a computer or other devices for programmable control.
- Sikringsholder: Contains the main AC input fuse.
6. Opsætning
6.1 Indledende inspektion
Before connecting the power supply, inspect the unit for any signs of physical damage that may have occurred during shipping. If any damage is found, contact your supplier immediately.
6.2 Indstilling af indgangsvolumentage
Find voltage selector switch on the rear panel of the unit. Ensure it is set to match your local AC mains voltage (110V eller 220V). Forkert indstilling kan beskadige enheden.

Figur 6.1: Rear panel showing the 110V/220V voltage selector switch. This switch must be correctly set to match the local AC power supply before operation.
6.3 Strømtilslutning
Connect the supplied AC power cord to the AC input socket on the rear panel and then plug it into a grounded wall outlet.
6.4 Udgangsforbindelser
Connect your load to the output terminals on the front panel using the provided test leads or other suitable leads. Ensure correct polarity: Red for positive (+), Black for negative (-). The green terminal is for chassis ground.
7. Betjeningsvejledning
7.1 Tænd/sluk
- Tryk på MAGT button on the front panel to turn the unit ON. The display will illuminate.
- Tryk på MAGT knappen igen for at slukke enheden.
7.2 Indstilling Voltage og Nuværende
- Tryk på BINDTAGE/AKTUEL button to select whether you are adjusting voltage or current. The corresponding display will flash.
- Brug Venstre/højre pil buttons to select the digit you wish to adjust. The selected digit will flash.
- Drej på Setting Adjustment Dial to change the value of the selected digit.
- Når den ønskede voltage and current limit are set, press the ON/OFF button to enable the output. The ON indikator lyser.

Figur 7.1: Close-up of the bright 4-digit LED display. This display provides precise and clear readouts of voltage and current, essential for accurate power delivery.
7.3 Hukommelsesfunktioner (M1-M4)
The unit allows you to save and recall up to four sets of voltage og aktuelle indstillinger.
- At gemme: Indstil den ønskede voltage and current. Press and hold the desired memory button (M1, M2, M3 eller M4) until you hear a beep or the display indicates saving.
- At erindre: Briefly press the desired memory button (M1, M2, M3 eller M4). The saved settings will be loaded.

Figur 7.2: Close-up of the memory save/recall buttons (M1-M4). These buttons allow users to quickly store and retrieve frequently used voltage og aktuelle indstillinger.
7.4 Output ON/OFF Control
De ON/OFF button controls the output power to the terminals independently of the main power switch.
- Trykke ON/OFF to enable output. The ON indikator lyser.
- Trykke ON/OFF again to disable output. The ON indikatoren slukkes.
- It is recommended to disable the output before connecting or disconnecting loads.
7.5 Låsefunktion
To prevent accidental changes to settings during operation, you can lock the front panel controls.
- Tryk og hold på A/mA knappen i et par sekunder, indtil LÅSE indicator illuminates. All front panel controls will be disabled.
- For at låse op skal du trykke på og holde nede A/mA knappen igen indtil LÅSE indikatoren slukker.
7.6 Over-Current Protection (OCP) and Over-Voltage-beskyttelse (OVP)
These features protect your connected load and the power supply from damage due to excessive current or voltage.
- Setting OCP/OVP: Tryk på OCP SET or OVP SET knap. Brug Setting Adjustment Dial og Venstre/højre pil buttons to set the desired protection limit.
- Activating OCP/OVP: Tryk på OCP or OVP button to enable the protection. The corresponding indicator will light up.
- When an OCP or OVP event occurs, the output will automatically shut off, and the respective indicator will flash. To reset, disable the protection or resolve the fault, then press the ON/OFF knappen for at genaktivere outputtet.

Figur 7.3: Close-up of the protection and control buttons. This image highlights the OCP, OVP, and Lock buttons, which are crucial for safe operation and preventing accidental changes.
8. Programmable Control
The KORAD KA3005P can be controlled remotely via a computer using the USB or RS232 ports located on the rear panel.
- Software installation: Insert the provided CD into your computer and follow the on-screen instructions to install the remote control software. Drivers for the USB/RS232 interface may also be included.
- Forbindelse: Connect the power supply to your computer using the supplied USB cable or an RS232 cable (not included for RS232).
- Softwaredrift: Launch the installed software. Select the correct COM port corresponding to your connected power supply. The software allows you to set voltage, current, enable/disable output, and configure protection limits from your computer. Some software versions may support programmable sequences or data logging.
- Seriel protokol: For advanced users, the user manual and CD typically contain documentation on the serial communication protocol, allowing for custom software development or integration with other programming environments (e.g., LabVIEW, Python).
Figur 8.1: Rear panel showing USB and RS232 ports for programmable control. The image also displays the included user manual, USB cable, test leads, and software CD, which facilitate remote operation.
For software downloads or updates, please refer to the official KORAD website or the link provided in the manual (e.g., www.koradtechnology.com).
9. Vedligeholdelse
The KORAD KA3005P is designed for reliable operation with minimal maintenance. Follow these guidelines:
- Rensning: Disconnect the power supply from the AC mains before cleaning. Use a soft, dry cloth to wipe the exterior. Do not use abrasive cleaners or solvents.
- Ventilation: Ensure the ventilation openings on the sides and rear of the unit are free from dust and obstructions. Periodically clean the fan vents with compressed air if necessary.
- Udskiftning af sikring: If the unit does not power on, check the fuse located in the fuse holder on the rear panel. Replace only with a fuse of the same type and rating (e.g., 5A/250V for 110V input, 3A/250V for 220V input). Always disconnect the power cord before replacing the fuse.
- Opbevaring: Når enheden ikke er i brug i længere perioder, skal den opbevares køligt og tørt, væk fra direkte sollys og ekstreme temperaturer.
10. Fejlfinding
If you encounter issues with your KORAD KA3005P, refer to the following common problems and solutions:
| Problem | Mulig årsag | Løsning |
|---|---|---|
| Enheden tænder ikke. | No AC power; Blown fuse; Incorrect voltage-vælgerindstilling. | Check power cord connection and wall outlet. Replace fuse if blown. Verify voltage selector (110V/220V) on rear panel is correct. |
| Ingen output voltage/strøm. | Output is OFF; OCP/OVP triggered; Short circuit at output. | Tryk på ON/OFF button to enable output. Check if OCP/OVP indicators are flashing; resolve fault and reset. Check for short circuits in the load or test leads. |
| Udgang voltage/strømmen er ustabil. | Poor load connection; Overheating; Faulty test leads. | Ensure secure connections to the load. Check ventilation and allow unit to cool. Inspect and replace test leads if damaged. |
| Displayet viser forkerte aflæsninger. | Calibration issue; External interference. | If readings are consistently inaccurate, contact support for calibration. Minimize external electromagnetic interference. |
| Software communication issues. | Incorrect COM port; Driver issues; Software incompatibility. | Verify COM port selection in software. Reinstall USB/RS232 drivers. Ensure software version is compatible with your operating system. Refer to software documentation. |
If the problem persists after attempting these solutions, please contact KORAD customer support.
11. Specifikationer
Technical specifications for the KORAD KA3005P Programmable DC Power Supply:

Figur 11.1: KORAD KA3005P Unit Specifications. This image provides a visual summary of the key technical parameters of the power supply.
| Parameter | Værdi |
|---|---|
| VoltagRækkevidde | 0-30V |
| Nuværende rækkevidde | 0-5A |
| Load Regulation (Voltage) | ≤0.01%+2mV |
| Load Regulation (Current) | ≤0.1 %+10mA |
| Line Regulation (Voltage) | ≤0.01%+3mV |
| Line Regulation (Current) | ≤0.1 %+3mA |
| Setup Resolution (Voltage) | 10mV |
| Setup Resolution (Current) | 1mA |
| Setup Accuracy (25°C ± 5°C) (Voltage) | ≤0.5%+20mV |
| Setup Accuracy (25°C ± 5°C) (Current) | ≤0.5 %+10mA |
| Ripple (20-20M) (Voltage) | ≤2mVrms |
| Ripple (20-20M) (Current) | ≤2mArms |
| Temperaturkoefficient (voltage) | ≤150 ppm |
| Temperature Coefficient (Current) | ≤150 ppm |
| Read Back Resolution (Voltage) | 10mV |
| Read Back Resolution (Current) | 1mA |
| Reaction Time (Voltage Rise) | ≤100mS (Voltage Drop) |
| Interface | Programmable (USB, RS232) |
| Vægt | 9.52 lbs / 4.32 kg |
| Dimensioner (B x H x D) | 100 mm (B) x 156 mm (H) x 260 mm (D) |
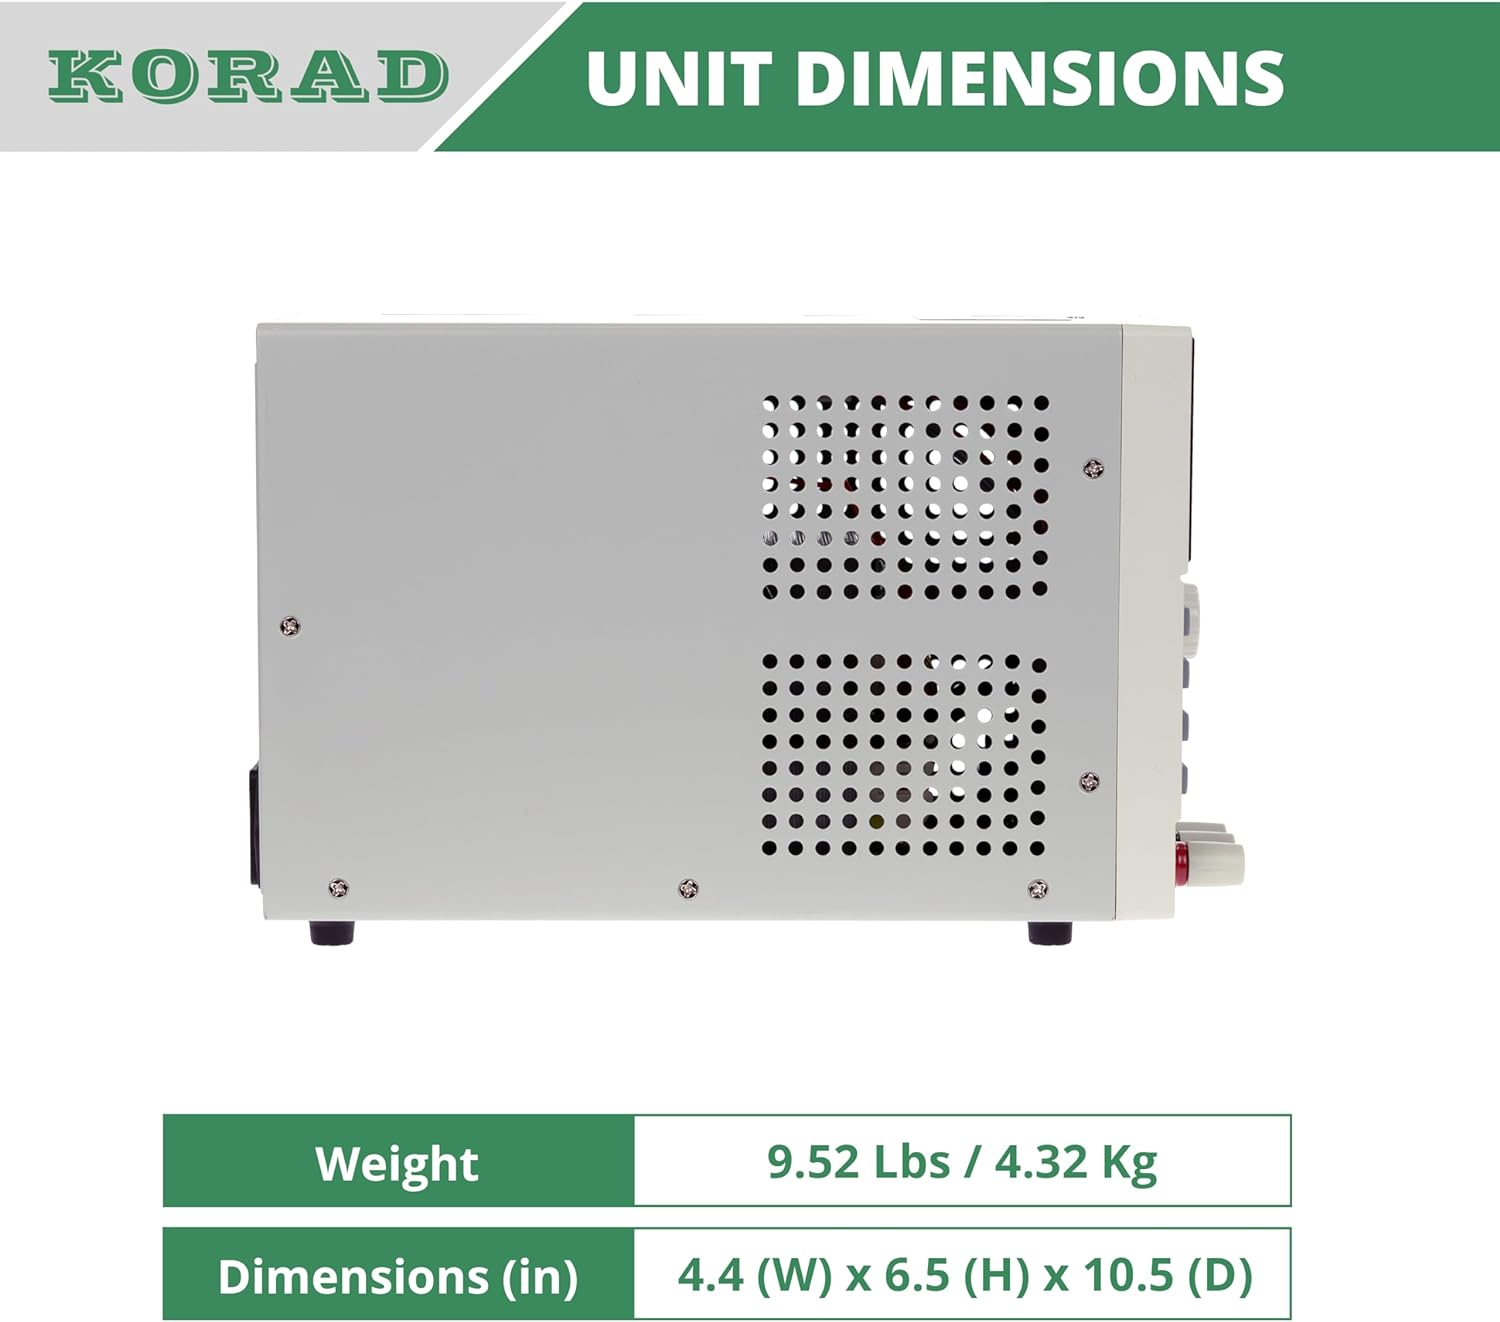
Figur 11.2: Side view of the KORAD KA3005P, illustrating its physical dimensions. The unit measures 4.4 inches (W) x 6.5 inches (H) x 10.5 inches (D).
12. Garanti og support
KORAD products are manufactured to high quality standards. For warranty information and technical support, please refer to the documentation included with your purchase or visit the official KORAD webwebsted.
- Garanti: Please retain your proof of purchase for warranty claims. Warranty terms and conditions may vary by region.
- Teknisk support: For technical assistance, troubleshooting beyond this manual, or service inquiries, please contact KORAD customer support through their official channels.
- Online ressourcer: Check the KORAD website for updated manuals, software, and FAQs.