Indledning
Tak for købetasing the GPX Weatherx WR282B Weather and Alert Radio. This portable radio is designed to provide you with AM/FM radio reception and access to all 7 NOAA weatherband channels, ensuring you stay informed during various conditions. It offers flexible power options, operating on either AC power or D-size batteries, making it suitable for both indoor and outdoor use.
Læs venligst denne manual grundigt, inden du bruger enheden, for at sikre korrekt brug og for at maksimere dens ydeevne og levetid.
Vigtige sikkerhedsoplysninger
- Læs instruktionerne: Alle sikkerheds- og betjeningsinstruktioner skal læses, før produktet tages i brug.
- Gem instruktionerne: Sikkerheds- og betjeningsvejledningen skal opbevares til fremtidig reference.
- Vær opmærksom på advarsler: Alle advarsler på produktet og i betjeningsvejledningen skal overholdes.
- Følg instruktionerne: Alle betjenings- og brugsanvisninger skal følges.
- Vand og fugt: Do not use this product near water (e.g., near a bathtub, washbowl, kitchen sink, laundry tub, in a wet basement, or near a swimming pool).
- Rensning: Rengør kun med en tør klud.
- Ventilation: Bloker ikke ventilationsåbninger. Installer i overensstemmelse med producentens anvisninger.
- Varme: Må ikke installeres i nærheden af varmekilder såsom radiatorer, varmeapparater, komfurer eller andre apparater (inklusive ampløftere), der producerer varme.
- Strømkabelbeskyttelse: Beskyt netledningen mod at blive trådt på eller klemt, især ved stik, stikkontakter og det sted, hvor de kommer ud af apparatet.
- Lyn: Træk stikket ud af dette apparat under tordenvejr, eller når det ikke skal bruges i længere perioder.
- Service: Overlad al service til kvalificeret servicepersonale. Service er påkrævet, når apparatet er blevet beskadiget på nogen måde, såsom strømforsyningsledning eller stik er beskadiget, væske er blevet spildt, eller genstande er faldet ind i apparatet, apparatet har været udsat for regn eller fugt, ikke fungerer normalt , eller er blevet droppet.
Funktioner
- AM/FM-radiotuner
- Weatherband - All 7 NOAA Channels
- Swivel Telescopic Antenna
- Lydstyrkekontrol
- Audio Line Input (Auxiliary Input)
- Integreret bærehåndtag
- Dual Power Options: AC/DC Adapter or 3 x 'D' Batteries
Pakkens indhold
- GPX Weatherx WR282B Weather and Alert Radio
- AC/DC strømadapter
- Brugervejledning (dette dokument)
Kontroller og indikatorer
Familiarize yourself with the various controls and indicators on your WR282B radio.
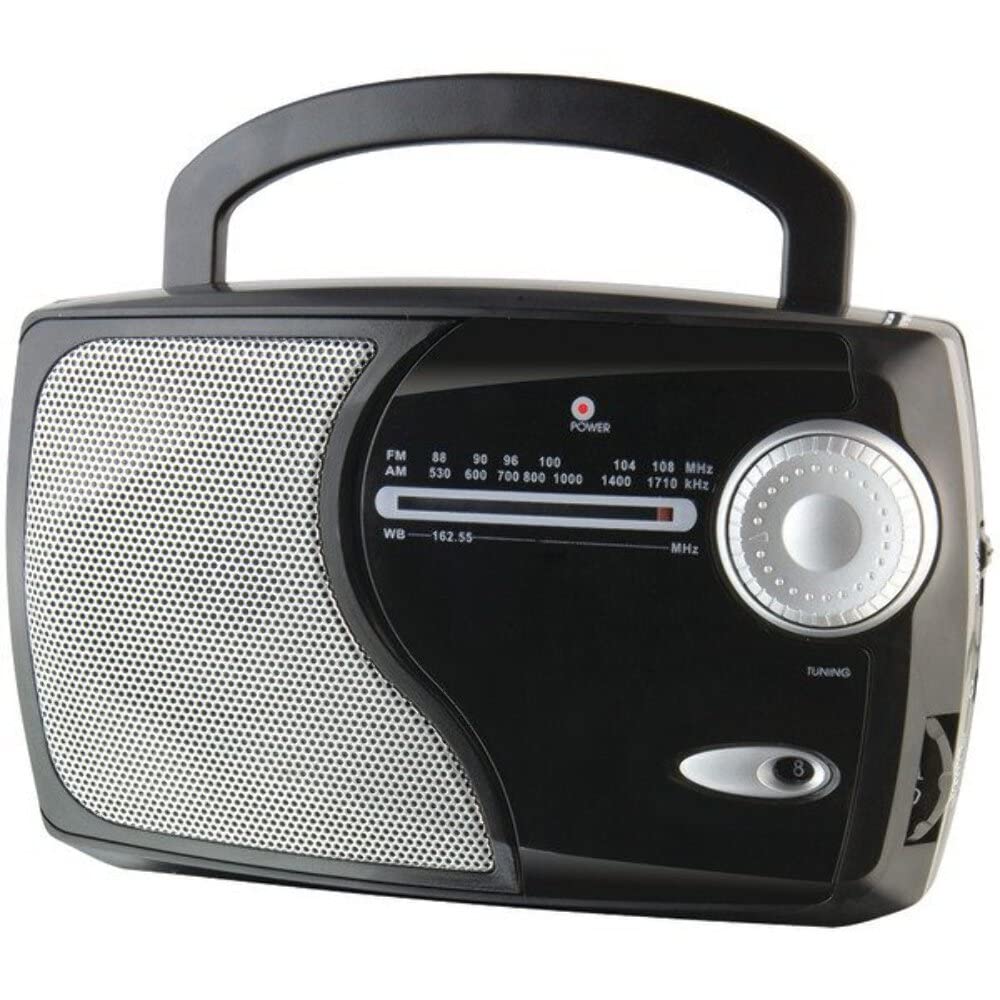
Billede: Forside view of the GPX Weatherx WR282B radio, showing the speaker, tuning dial, and control knobs.
- Strøm-/lydstyrkeknap: Turns the radio on/off and adjusts the audio output level.
- Båndvælgerkontakt: Selects between AM, FM, and Weatherband (WB) modes.
- Tuning knap: Adjusts the frequency to tune into desired radio stations or weather channels.
- Tuning Indicator: Illuminates when a strong signal is received.
- Frekvensopkald: Viser den aktuelle radiofrekvens.
- Teleskopantenne: Extendable antenna for improved FM and Weatherband reception.
- Aux-indgang (AUX IN): 3.5 mm jackstik til tilslutning af eksterne lydenheder.
- AC strømindgang: Jack for connecting the included AC/DC power adapter.
- Batterirum: Located on the back, holds 3 'D' size batteries.
- Bærehåndtag: For nem transport.
Opsætning
Strøm til radioen
The WR282B radio can be powered using either the included AC/DC power adapter or three 'D' size batteries.
1. AC Power Operation
- Ensure the radio is turned off by rotating the Power/Volume knob counter-clockwise until it clicks.
- Insert the small plug of the AC/DC power adapter into the AC Power Input jack on the radio.
- Plug the other end of the AC/DC power adapter into a standard wall outlet (AC 120V~60Hz).
- The radio is now ready for use with AC power.
Note: When the AC adapter is connected, battery power is automatically disconnected.
2. Battery Power Operation
- Sørg for, at radioen er slukket.
- Find batterirummet på bagsiden af radioen.
- Åbn batterirummets dæksel.
- Insert three (3) 'D' size batteries (not included) into the compartment, observing the correct polarity (+/-) as indicated inside the compartment.
- Luk batterirummets dæksel forsvarligt.
- The radio is now ready for use with battery power.
Vigtig: Fjern batterierne, hvis radioen ikke skal bruges i længere tid, for at forhindre lækage og skader.
Betjeningsvejledning
1. Turning On and Adjusting Volume
- Drej på Strøm-/lydstyrkeknap clockwise to turn on the radio. Continue rotating to increase the volume to a comfortable listening level.
- For at slukke for radioen skal du dreje på Strøm-/lydstyrkeknap mod uret, indtil det klikker.
2. Selecting a Radio Band (AM/FM/Weatherband)
- Brug Båndvælgerkontakt to choose your desired listening mode:
- ER: For Amplitude Modulation radio stations.
- FM: For Frequency Modulation radio stations.
- WB: For NOAA Weatherband channels.
3. Tuning to a Station or Channel
- Forlæng Teleskop antenne fully for optimal FM and Weatherband reception. For AM reception, the radio has a built-in antenna, and adjusting the radio's position may improve reception.
- Drej på Tuningknap to scan through frequencies on the Frekvensopkald.
- When a strong signal is received, the Indstillingsindikator lyset vil lyse.
- For Weatherband (WB) mode, tune to one of the 7 NOAA weather channels (162.400 MHz to 162.550 MHz).
4. Using the Auxiliary Input (AUX IN)
- Connect a 3.5mm audio cable (not included) from your external audio device (e.g., MP3 player, smartphone) to the Aux-indgang (AUX IN) jack on the radio.
- Ensure the radio is turned on and the volume is adjusted.
- The audio from your external device will now play through the radio's speaker. Control playback and track selection from your external device.
Opretholdelse
- Rensning: Tør radioens yderside af med en blød, tør klud. Brug ikke slibende rengøringsmidler, voks eller opløsningsmidler.
- Udskiftning af batteri: Replace all three 'D' batteries when the radio's performance diminishes or if the unit will not be used for an extended period. Always replace with new batteries of the same type.
- Opbevaring: When storing the radio for a long time, remove the batteries to prevent leakage. Store in a cool, dry place away from direct sunlight and extreme temperatures.
- Antennepleje: Håndter teleskopantennen forsigtigt for at undgå at den bøjer eller knækker.
Fejlfinding
| Problem | Mulig årsag | Løsning |
|---|---|---|
| Ingen strøm |
|
|
| Dårlig radiomodtagelse |
|
|
| Ingen lyd fra AUX IN |
|
|
Specifikationer
- Model: WR282B
- Radiobånd: AM, FM, Weatherband (7 NOAA channels)
- Strømkilde: AC 120V~60Hz (via included adapter) or 3 x 'D' Batteries (not included)
- Forbindelse: 3.5 mm hjælpeindgang
- Antenne: Telescopic (FM/WB), Built-in Ferrite Bar (AM)
- Produktdimensioner: 8.86" L x 2.76" W x 5.51" H (approximately)
- Varens vægt: 1.06 kg (uden batterier)
Garanti og support
For detailed warranty information and customer support, please refer to the warranty card included with your product or visit the official GPX webwebsted. Gem din købskvittering som købsbevis i tilfælde af garantikrav.
If you experience issues not covered in the troubleshooting section, please contact GPX customer service for assistance.