VUPOINT PDS-ST441-VP
Magic Wand Portable Scanner User Manual
Model: PDS-ST441-VP
Indledning
Thank you for choosing the VUPOINT Solutions PDS-ST441-VP Magic Wand Portable Scanner. This compact and versatile device allows you to easily scan color and monochromatic images, documents, and magazines on the go. With its high resolution capabilities and convenient preview display, it's an ideal tool for digitizing your important papers and visuals.
Pakkens indhold
Kontroller venligst pakkens indhold for at sikre, at alle varer er til stede:
- VUPOINT Solutions PDS-ST441-VP Magic Wand Portable Scanner
- USB 2.0-kabel
- 2 x AA batterier (medfølger)
- Rengøringsklud
- Bæretaske
- Brugervejledning (dette dokument)
Produkt overview
Familiarize yourself with the components of your Magic Wand Portable Scanner.
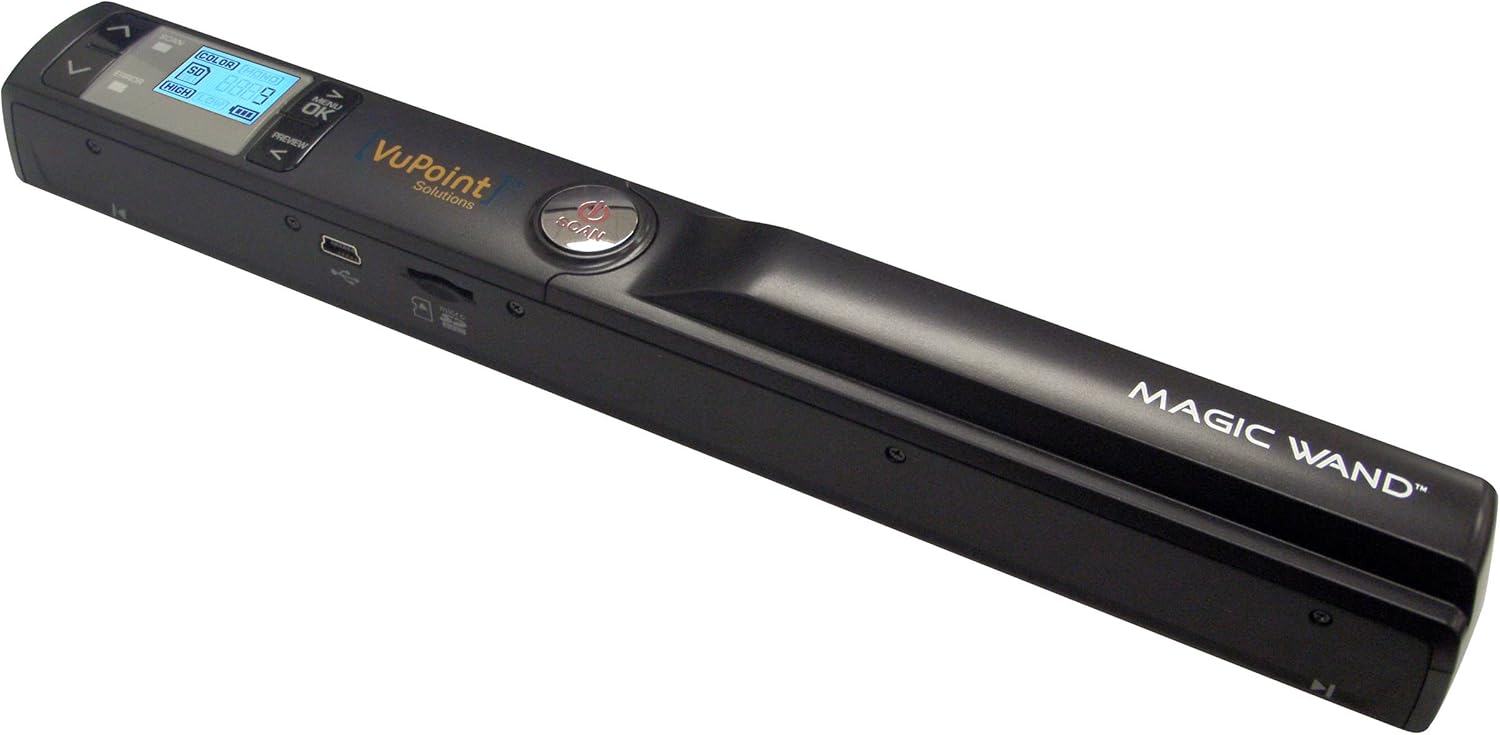
Figur 1: The VUPOINT Magic Wand Portable Scanner, showcasing its sleek black design, integrated color display, and control buttons. The scanner features a USB port and a microSD card slot on its side.
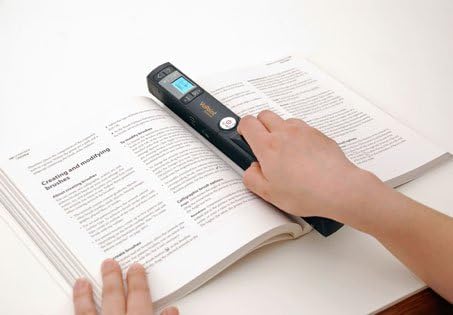
Figur 2: A user demonstrating the portable scanner in action, gliding it across an open book page. This illustrates the handheld nature and ease of use for digitizing printed materials.
Nøglefunktioner:
- Portable design for on-the-go scanning.
- 1" CSTN LCD display for previewing scans.
- Multiple resolution settings: 300 DPI (Standard), 600 DPI (High), and 900 DPI (Fine).
- Supports JPEG and PDF file formater.
- 2x, 4x, 8x preview zoom capability.
- USB 2.0-forbindelse til dataoverførsel.
Opsætning
1. Batteriinstallation
- Find batteridækslet på scanneren.
- Skub dækslet åbent.
- Isæt to (2) AA-batterier, og sørg for korrekt polaritet (+/-) som angivet i batterirummet.
- Luk batterirummets dæksel forsvarligt.
2. Indsættelse af microSD-kort
The scanner requires a microSD card (not included, unless specified in package) to store scanned images.
- Find microSD-kortstikket på siden af scanneren.
- Gently insert the microSD card into the slot with the gold contacts facing down, until it clicks into place.
- For at fjerne det skal du forsigtigt skubbe kortet ind, indtil det klikker, og derefter slippe det for at skubbe det ud.
3. Første opstart
Press and hold the Power button until the display turns on. The scanner is now ready for use.
Betjeningsvejledning
1. Tænd/sluk
- For at tænde: Tryk og hold på Magt knappen, indtil LCD-skærmen lyser.
- For at slukke: Tryk og hold på Magt button until the LCD screen turns off. The scanner will also automatically power off after a period of inactivity to conserve battery.
2. Setting Scan Mode and Resolution
Use the buttons next to the display to navigate and select settings:
- DPI -indstilling: Tryk på DPI button to cycle through 300 DPI (Std), 600 DPI (High), and 900 DPI (Fine). Higher DPI results in better quality but larger file størrelser.
- Farvetilstand: Tryk på Farve/Mono button to switch between Color and Monochromatic (Black & White) scanning.
- File Format: Some models allow switching between JPEG and PDF. Refer to your scanner's display for this option.
3. Udførelse af en scanning
- Place the document or image you wish to scan on a flat, stable surface.
- Hold the scanner firmly with both hands.
- Align the scanner's scanning window with the top edge of the document.
- Tryk på SCAN button once to start scanning. The scan indicator light will illuminate.
- Slowly and steadily glide the scanner downwards across the document, maintaining even pressure. Avoid tilting or lifting the scanner.
- Once you reach the end of the document, press the SCAN button again to stop scanning. The scan indicator light will turn off.
- The scanned image will be saved to the microSD card.
Tip: For best results, practice scanning on a few scrap documents to get a feel for the optimal speed and pressure.
4. Forudviewing Scans
Use the built-in 1" CSTN LCD display to preview your scanned images. Use the navigation buttons to scroll through saved files. The display supports 2x, 4x, and 8x zoom for detailed inspection.
5. Overførsel Files til en computer
There are two primary methods to transfer your scanned files:
- Direkte USB-forbindelse:
- Slut scanneren til din computer ved hjælp af det medfølgende USB-kabel.
- The scanner will appear as a removable disk drive on your computer.
- Open the drive to access the "DCIM" folder, where your scanned images are stored.
- Kopiér og indsæt files to your desired location on the computer.
- Using a MicroSD Card Reader:
- Safely eject the microSD card from the scanner.
- Insert the microSD card into a compatible card reader connected to your computer.
- Access the card as a removable drive and transfer your files.
Opretholdelse
1. Rengøring af scanneren
- Sørg for, at scanneren er slukket, inden rengøring.
- Use the provided cleaning cloth or a soft, lint-free cloth to gently wipe the exterior of the scanner.
- For the scanning glass/lens, use a specialized lens cleaning solution and a microfiber cloth. Do not use abrasive cleaners or solvents.
- Regularly clean the paper path and rollers to prevent dust and debris from affecting scan quality.
2. Batteripleje
- Fjern batterierne, hvis scanneren ikke skal bruges i længere tid, for at forhindre lækage.
- Use high-quality alkaline or rechargeable AA batteries for optimal performance.
3. Opbevaring
Store the scanner in a cool, dry place, away from direct sunlight, extreme temperatures, and high humidity. Use the provided carrying pouch for protection during transport.
Fejlfinding
| Problem | Mulig årsag | Løsning |
|---|---|---|
| Scanneren tænder ikke. | Lave eller døde batterier; forkert batteriindsætning. | Udskift batterierne, eller sørg for, at de er isat med den korrekte polaritet. |
| Dårlig scanningskvalitet (striber, slørede billeder). | Dirty scanning lens/rollers; uneven scanning speed; document movement. | Clean the scanner lens and rollers. Scan slowly and steadily. Ensure document is flat and still. |
| Cannot save scans. | MicroSD card full; card not inserted correctly; card error. | Slet gammel files or use a new/empty microSD card. Reinsert the card. Format the card (this will erase all data). |
| Scanneren genkendes ikke af computeren. | Loose USB connection; faulty USB cable; driver issue. | Ensure USB cable is securely connected. Try a different USB port or cable. Restart computer. |
Specifikationer
| Feature | Detalje |
|---|---|
| Produktdimensioner | 10.1 x 1.2 x 1.1 tommer |
| Varens vægt | 4.8 ounce |
| Modelnummer | PDS-ST441-VP |
| Batterier | 2 AA batterier (medfølger) |
| Medietype | USB |
| Scanner type | Dokument |
| Mærke | VuPoint |
| Forbindelsesteknologi | USB |
| Opløsning | 300 DPI, 600 DPI, 900 DPI |
| Ark størrelse | Brev, A4 |
| Minimum systemkrav | Windows 7 |
| UPC | 874121003710 |
Garanti og support
For warranty information and technical support, please refer to the warranty card included with your product or visit the official VuPoint Solutions webwebsted. Gem din købskvittering som købsbevis i tilfælde af garantikrav.
For further assistance, you may contact VuPoint Solutions customer service through their official channels.
Ask a question about this manual
Ask about setup, troubleshooting, compatibility, parts, safety, or missing instructions. Manuals+ will review the question and use this page’s manual context to help answer it.