Indledning
This manual provides essential instructions for the safe and effective use of your Canon PowerShot A4000 IS 16.0 MP Digital Camera. It covers basic setup, operation, maintenance, and troubleshooting to help you capture high-quality photos and 720p HD videos. The camera features an 8x optical zoom, a 28mm wide-angle lens, and optical image stabilization for clear images.
Hvad er der i æsken
Bekræft, at alle dele er til stede i din kamerapakke:
- Canon PowerShot A4000 IS digitalkamera
- Batteripakke
- Batterioplader
- USB kabel
- Håndledsrem
- Digital Camera Solution Disk (CD-ROM)

Figur 1: Included accessories with the Canon PowerShot A4000 IS camera.
Camera Parts and Functions
Front View

Figur 2: Front view af kameraet.
- Linse: Optager billeder.
- Blitz: Giver belysning under forhold med svagt lys.
- Udløserknap: Tryk halvt ned for at fokusere, helt ned for at tage et billede.
- Zoom-greb: Styrer optisk zoom (W for vidvinkel, T for telefoto).
- Power knap: Tænder eller slukker kameraet.
Bag View
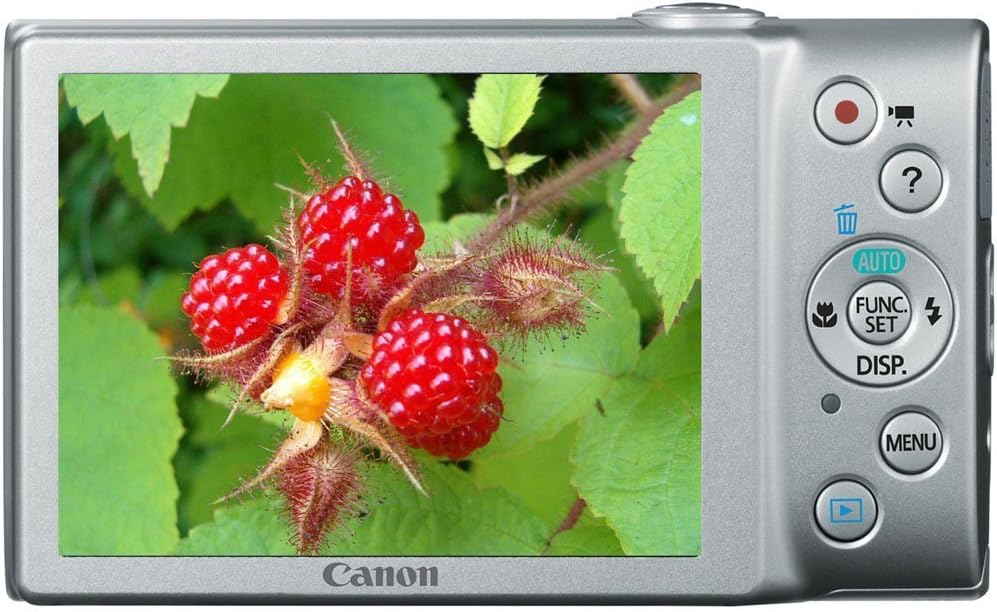
Figur 3: Bag view of the camera with LCD screen.
- LCD-skærm: Displays images, menus, and camera settings.
- Movie Button: Starter og stopper videooptagelse.
- Afspilningsknap: Skifter til afspilningstilstand for at view fotos og videoer.
- MENU knap: Giver adgang til kameraindstillinger og -valgmuligheder.
- FUNC./SET Button: Confirms selections and accesses shooting function menus.
- Retningsknapper (op, ned, venstre, højre): Naviger i menuer og juster indstillinger.
Opsætning
1. Inserting the Battery Pack
- Open the battery cover on the bottom of the camera.
- Insert the battery pack with the contacts facing the correct direction, as indicated by the diagram inside the compartment.
- Close the battery cover securely until it clicks.
2. Indsættelse af et hukommelseskort
- Åbn batteri-/kortdækslet.
- Insert an SD, SDHC, or SDXC memory card into the card slot until it clicks into place. Ensure the card is oriented correctly.
- Luk låget sikkert.
3. Indstilling af dato og klokkeslæt
- Tænd kameraet.
- If prompted, follow the on-screen instructions to set the date, time, and time zone. Use the directional buttons to navigate and the FUNC./SET button to confirm.
Betjening af kameraet
1. Tænd/sluk for kameraet
- Tryk på MAGT button to turn the camera on.
- Tryk på MAGT button again to turn the camera off.
2. Taking Still Photos (Smart AUTO Mode)
- Turn on the camera. The camera will typically start in Smart AUTO mode.
- Frame your subject on the LCD monitor.
- Tryk på Udløserknap halfway down to focus. The focus frame will appear green when focus is achieved.
- Tryk på Udløserknap fully down to take the picture.
3. Optagelse af film
- With the camera on, press the dedicated Filmknap (red dot icon). Recording will begin immediately.
- Tryk på Filmknap igen for at stoppe optagelsen.
4. ViewOptagelse af billeder (afspilningstilstand)
- Tryk på Afspilningsknap (blue arrow icon).
- Use the directional buttons to scroll through your photos and videos.
- Tryk på for at vende tilbage til optagetilstand Afspilningsknap igen eller tryk på Udløserknap halvvejs.
Avancerede funktioner
1. Brug af optisk zoom
While in shooting mode, push the Zoomhåndtag mod T (Telephoto) to zoom in on your subject, or towards W (Wide-angle) to zoom out.
2. Blitztilstande
I optagetilstand skal du trykke på Up Directional Button to cycle through flash modes:
- Auto: Blitzen udløses automatisk, når det er nødvendigt.
- På: Blitzen går af for hvert billede.
- Slukket: Blitzen går ikke ud.
3. Optagetilstande
Tryk på FUNC./SET Button to access various shooting modes, including:
- Smart AUTO: Kameraet vælger automatisk optimale indstillinger.
- Program (P): Giver manuel kontrol over visse indstillinger, mens kameraet indstiller eksponeringen.
- Scenetilstande: Pre-set modes for specific situations (e.g., Portrait, Landscape, Night Snapshot).
Opretholdelse
1. Rengøring af kameraet
- Brug en blød, tør klud til at rengøre kamerahuset.
- For the lens, use a lens brush or a soft, lint-free cloth specifically designed for optical surfaces. Avoid touching the lens directly with your fingers.
- Rengør LCD-skærmen med en blød, tør klud.
2. Batteripleje
- Oplad batteriet helt før første brug og efter længere perioder uden brug.
- Opbevar batteriet på et køligt, tørt sted, når det ikke er i brug.
- Udsæt ikke batteriet for ekstreme temperaturer.
3. Opbevaring
When storing the camera for an extended period, remove the battery and memory card. Store the camera in a dry, well-ventilated area, away from direct sunlight and extreme temperatures.
Fejlfinding
| Problem | Løsning |
|---|---|
| Kameraet tænder ikke. | Ensure the battery is charged and inserted correctly. Try recharging the battery. |
| Billeder er slørede. | Check if the lens is clean. Ensure the camera is held steady. Use the flash in low light. Allow the camera to focus before fully pressing the shutter button. |
| Blitzen går ikke ud. | Check the flash mode setting. Ensure it is not set to 'Off'. The flash may not fire if the ambient light is sufficient. |
| Fejl på hukommelseskort. | Ensure the memory card is inserted correctly. Try formatting the card (this will erase all data). Use a different memory card. |
| Kan ikke optage video. | Check if the memory card has sufficient free space. Ensure the battery has enough charge. |
Specifikationer
| Feature | Detalje |
|---|---|
| Effektiv stillopløsning | 16.0 megapixel |
| Optisk zoom | 8x |
| Linse | 28 mm vidvinkel |
| Billedstabilisering | Optisk |
| Video opløsning | 720p HD |
| LCD skærmstørrelse | 3.0 tommer |
| Fotosensorteknologi | CMOS |
| Understøttet File Format | JPEG (Exif 2.3) |
| Hukommelseskorttype | SD/SDHC/SDXC |
| Forbindelse | USB |
| Modelnummer | 6148B001 |
Garanti og support
Garantioplysninger
This Canon PowerShot A4000 IS Digital Camera comes with a 1 års begrænset garanti from the date of purchase. Please retain your proof of purchase for warranty claims. The warranty covers manufacturing defects but typically excludes damage caused by misuse, accidents, or unauthorized repairs.
Kundesupport
For technical assistance, service, or further information, please refer to the official Canon support webwebstedet eller kontakt deres kundeservice. Kontaktoplysninger kan normalt findes på producentens webwebstedet eller i den dokumentation, der følger med dit produkt.