1. Introduktion
Tak for købetasing the Hello Kitty KT2064 AM/FM Projection Alarm Clock Radio. This device combines a digital alarm clock with an AM/FM radio and a unique projection feature, allowing you to display the time on your ceiling or wall. Please read this manual carefully to ensure proper operation and to fully utilize all features of your new alarm clock radio.

Billede 1.1: Forside view of the Hello Kitty KT2064 Projection Alarm Clock Radio, showing the digital display and the Hello Kitty design.
2. Funktioner
- Projektionsfunktion: Projects the time onto your ceiling or wall with adjustable focus and up to 120-degree pivot angle.
- Dual Alarm Options: Wake up to either a buzzer alarm or your favorite radio station.
- AM/FM radio: Integrated radio tuner for listening to broadcast stations.
- Snooze-funktion: Allows for an additional 9 minutes of sleep before the alarm sounds again.
- Sleep to Radio: Set a timer (up to 2 hours) for the radio to play before automatically turning off.
- Batteri-sikkerhedskopi: Bevarer tids- og alarmindstillinger under strømafbrydelsetages (requires 3 CR2025 button cell batteries, not included).
- LED Time Display: Clear red LED display for current time.
3. Pakkens indhold
Tjek venligst pakken for følgende varer:
- Hello Kitty KT2064 Projection Alarm Clock Radio Unit
- AC strømadapter
- Brugervejledning (dette dokument)
Note: 3 CR2025 button cell batteries for backup are not included and must be purchased separately.
4. Opsætning
4.1 Strømtilslutning
- Unpack the alarm clock radio and its accessories.
- Connect the AC power adapter to the DC input jack located on the back of the unit.
- Plug the other end of the AC power adapter into a standard wall outlet. The unit will power on, and the LED display will light up.
4.2 Installing Backup Batteries
Installing backup batteries ensures that your time and alarm settings are retained during a power outage.
- Find batterirummet i bunden eller bagsiden af enheden.
- Åbn batterirummets dæksel.
- Insert 3 CR2025 button cell batteries, observing the correct polarity (+ and - markings).
- Luk batterirummets dæksel forsvarligt.

Billede 4.2: Bagside view of the alarm clock radio, showing control buttons and potential location for battery compartment.
5. Betjeningsvejledning
5.1 Indstilling af klokkeslæt
- Tryk og hold på TIDSINDSTILLING button (or similar button, refer to unit markings) for approximately 3 seconds until the hour digits begin to flash.
- Brug TIME or + / - knapperne til at justere timetallet. Vær opmærksom på AM/PM-indikatoren.
- Tryk på TIDSINDSTILLING knappen igen. Minuttiffrene vil blinke.
- Brug MINUT or + / - knapper for at justere minutterne.
- Tryk på TIDSINDSTILLING knappen én gang til for at bekræfte og afslutte tidsindstillingstilstanden.
5.2 Setting the Alarm (Alarm 1 and Alarm 2)
This unit supports two independent alarms.
- Tryk og hold på AL1 SÆT knap (for Alarm 1) eller AL2 SÆT button (for Alarm 2) for approximately 3 seconds until the hour digits of the alarm time begin to flash.
- Brug TIME or + / - knapper for at justere alarmtiden.
- Tryk på den respektive AL SET knappen igen. Minuttiffrene vil blinke.
- Brug MINUT or + / - knapper til at justere alarmens minutter.
- Tryk på AL SET knappen igen for at vælge alarmkilden: SUMMER or RADIO. Brug + / - buttons to toggle.
- Tryk på AL SET knappen én gang til for at bekræfte og afslutte alarmindstillingstilstand.
- For at aktivere/deaktivere en alarm skal du trykke på AL1 TIL/FRA or AL2 TIL/FRA button (or similar) repeatedly until the alarm indicator appears/disappears on the display.
5.3 Using the Radio
- Tryk på RADIO TIL/FRA knappen for at tænde for radioen.
- Tryk på AM/FM knappen for at skifte mellem AM- og FM-båndene.
- Brug TUNE+ og TUNE- knapperne til manuelt at stille ind på en ønsket station.
- For automatisk scanning, tryk og hold nede TUNE+ or TUNE- for a few seconds until the radio finds the next clear station.
- Juster lydstyrken ved hjælp af LYDSTYRKE + og VOLUME - knapper.
- Tryk på for at slukke for radioen RADIO TIL/FRA knappen igen.
5.4 Projektionsfunktion
- Locate the projector lens on top of the unit.
- Tryk på PROJEKTOR TIL/FRA button to activate the time projection.
- Adjust the angle of the projector head (up to 120 degrees) to direct the time display onto your ceiling or wall.
- Drej på FOKUS ring around the projector lens to achieve a clear image.
- To turn off the projection, press the PROJEKTOR TIL/FRA knappen igen.

Image 5.4: The alarm clock radio actively projecting the time and Hello Kitty logo onto a surface.
5.5 Snooze -funktion
Når alarmen lyder, skal du trykke på den store SLUM button (usually located on top of the unit). The alarm will pause for approximately 9 minutes and then sound again.
5.6 Sleep to Radio Function
This feature allows you to fall asleep to the radio, which will automatically turn off after a set period.
- Turn on the radio and tune to your desired station.
- Tryk på SOVE button repeatedly to cycle through the available sleep timer durations (e.g., 120, 90, 60, 30, 15 minutes, or OFF). The selected duration will appear on the display.
- The radio will play for the chosen duration and then automatically turn off.
6. Vedligeholdelse
- Rensning: Tør enheden af med en blød, tør klud. Brug ikke slibende rengøringsmidler eller opløsningsmidler.
- Vandeksponering: Hold enheden væk fra vand eller overdreven fugt.
- Temperatur: Undgå at udsætte enheden for ekstreme temperaturer eller direkte sollys.
- Udskiftning af batteri: Replace backup batteries annually or when the low battery indicator appears to ensure continuous functionality during power outages.
7. Fejlfinding
| Problem | Mulig årsag | Løsning |
|---|---|---|
| Enheden tænder ikke. | Strømadapteren er ikke tilsluttet, eller der er en defekt stikkontakt. | Ensure the power adapter is securely plugged into the unit and a working wall outlet. Test the outlet with another device. |
| Time/alarm settings are lost after power outage. | Backup-batterierne er døde eller ikke installeret. | Install new CR2025 button cell batteries or replace existing ones. |
| Projektionen er sløret. | Fokus er ikke justeret korrekt. | Drej på FOKUS ring around the projector lens until the image is clear. |
| Radiomodtagelsen er dårlig. | Antennen er ikke strakt ud, eller der er interferens. | Extend the FM wire antenna fully. For AM, try repositioning the unit. Avoid placing near electronic devices that may cause interference. |
| Alarmen lyder ikke. | Alarmen er ikke aktiveret eller indstillet forkert. | Ensure the alarm is set and activated (alarm indicator visible). Check alarm volume if set to radio. |
8. Specifikationer
| Mærke | Hej Kitty |
| Modelnummer | KT2064P |
| Display Type | Digital LED |
| Strømkilde | AC strømadapter |
| Backup batteri | 3 x CR2025 Button Cell (not included) |
| Radiofrekvens | AM/FM (FM up to 108 MHz) |
| Produktmål (L x B x H) | 14.5 x 11.9 x 17.3 cm (ca. 5.7 x 4.7 x 6.8 tommer) |
| Produktets vægt | 885 g (ca. 1.95 lbs) |
| Projektionsvinkel | Op til 120 grader |
| Snooze-varighed | 9 minutter |
| Sleep Timer | Op til 2 timer |
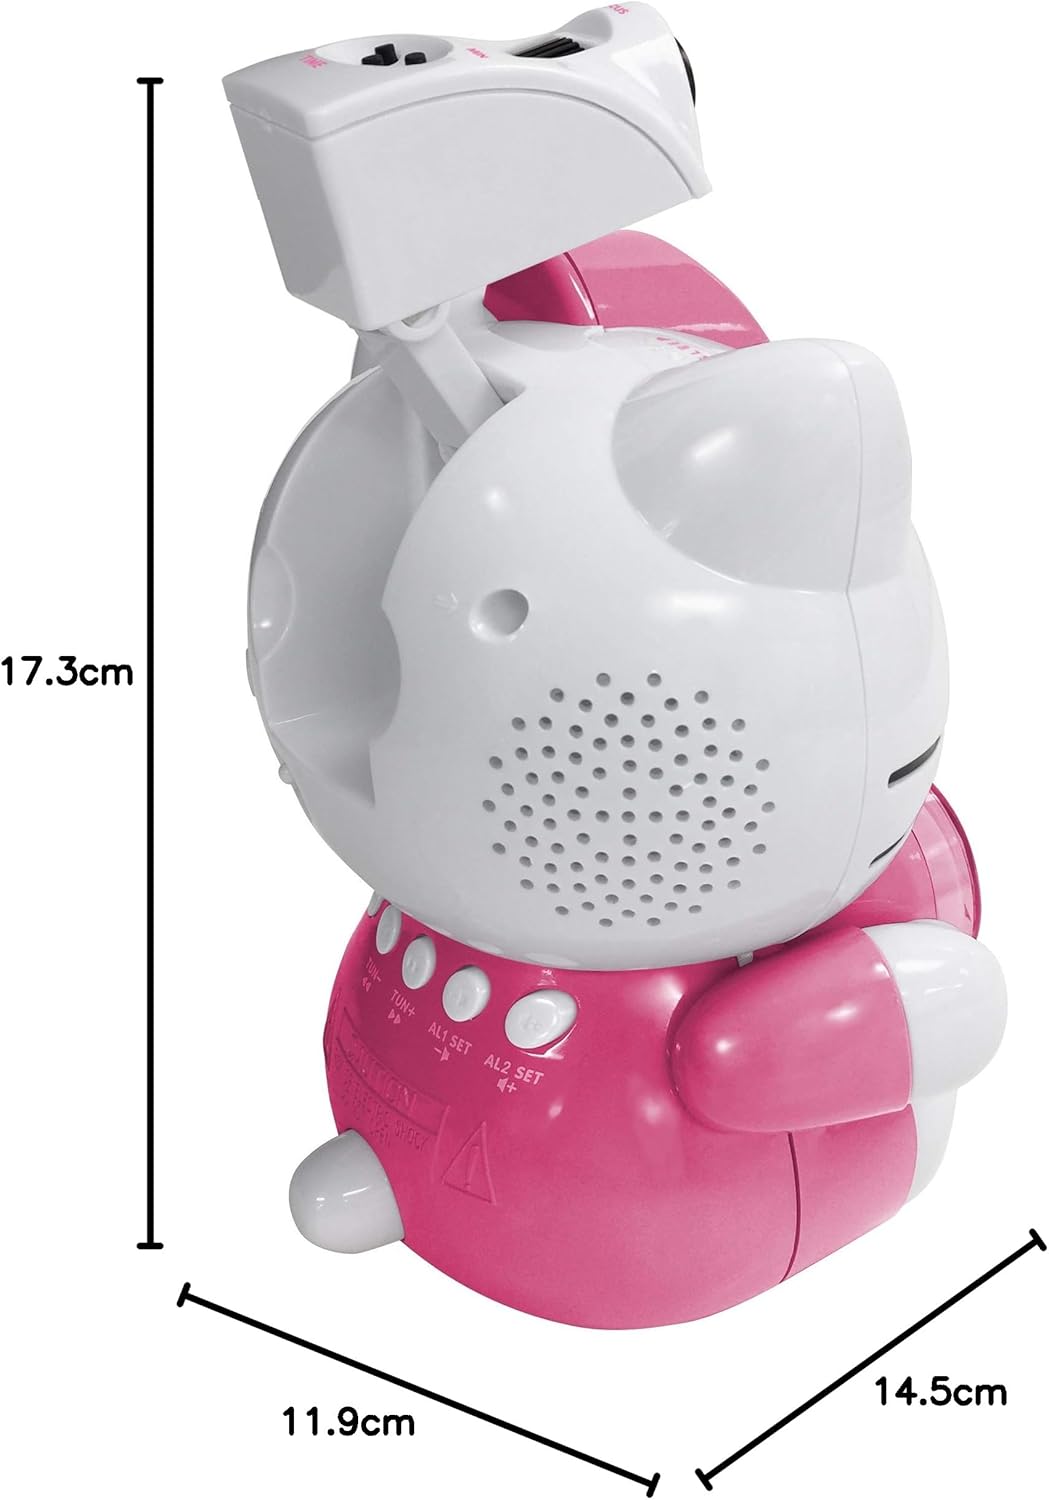
Image 8.1: Dimensions of the Hello Kitty KT2064 Projection Alarm Clock Radio.
9. Garanti og support
This product comes with a standard manufacturer's warranty. For specific warranty details, please refer to the documentation provided at the time of purchase or contact your retailer. If you encounter any issues not covered in the troubleshooting section, please contact customer support for assistance.
For support inquiries, please visit the official Hello Kitty product support webwebstedet eller kontakt din lokale forhandler.