
Indledning
Tak for købetasing the Edifier Tick Tock Retro Multifunctional Alarm Clock. This device combines a retro design with modern functionality, offering an alarm clock, FM radio, and media playback from SD cards, USB drives, and auxiliary input. This manual provides detailed instructions for setup, operation, and maintenance to ensure optimal performance and longevity of your device.
Produktegenskaber
- SD card reader and USB input port for media playback.
- LCD display screen for time, date, alarm status, and input mode (SD/USB/FM/AUX).
- Alarm clock function with customizable audio sources: SD card, USB drive, FM radio, or Auxiliary input.
- Auxiliary 3.5mm input jack for connecting external audio devices.
- FM radio function with 24 preset channels for easy access to your favorite stations.
- Two 360° omni-directional full-range speakers for rich, multi-directional sound.
Kontrol og porte
Porte til bagpanel
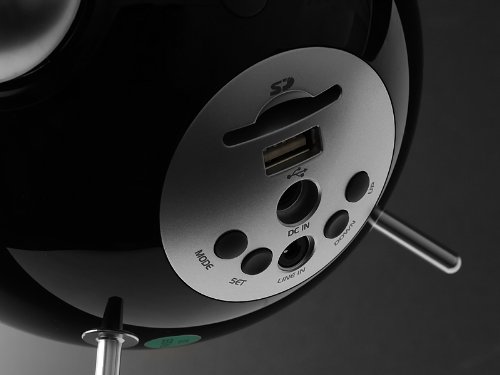
This image displays the rear panel of the Edifier Tick Tock alarm clock. Visible ports and buttons include:
- SD-kortplads: Insert an SD card for music playback.
- USB-port: Connect a USB flash drive for music playback.
- DC IN: Strømindgang til den medfølgende AC-adapter.
- LINE IN (AUX): 3.5 mm lydindgang til eksterne enheder.
- MODE knap: Cycles through input modes (SD, USB, FM, AUX).
- SET -knap: Used for entering settings menus (e.g., time, alarm).
- OP/NED knapper: Navigate menus, adjust volume, or change settings.
Kontrolpaneler på øverste panel
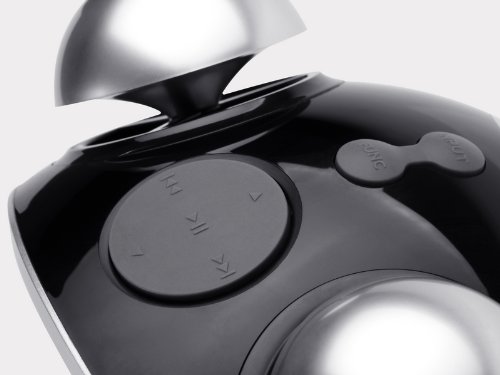
This image shows the top panel controls of the Edifier Tick Tock alarm clock. These include:
- Afspil/pause knap: Starter eller sætter medieafspilning på pause.
- Knapper til forrige/næste spor: Skips to the previous or next track during media playback. Also used for tuning FM radio.
- Knapper til lydstyrke op / ned: Justerer lydstyrken for udgangen.
- SNOOZE/LIGHT-knap: Activates snooze during an alarm or adjusts display brightness.
Opsætning
- Udpakning: Carefully remove the alarm clock and all accessories from the packaging. Ensure all components are present: the alarm clock unit, AC power adapter, and this user manual.
- Strømtilslutning: Connect the AC power adapter to the "DC IN" port on the rear of the alarm clock. Plug the adapter into a standard wall outlet. The display should illuminate.
- Første gang tændt: The unit should power on automatically. If not, press the power button (if available, otherwise it's always on when plugged in).
- Antenna (FM Radio): Extend the FM antenna located at the back of the unit for optimal radio reception.
Betjeningsvejledning
Indstilling af tid og dato
- Tryk og hold på SÆT knappen, indtil tidsvisningen begynder at blinke.
- Brug UP og NED knapperne for at justere timetallet. Tryk på SÆT for at bekræfte og gå til minutter.
- Juster minutter ved hjælp af UP og NED. Trykke SÆT for at bekræfte.
- Continue this process to set the year, month, and day. Press SÆT for at afslutte indstilling af tid/dato.
Indstilling af alarm
- Tryk på SÆT button once (do not hold) to enter alarm setting mode. The alarm time will flash.
- Brug UP og NED knapperne for at justere alarmens time. Tryk på SÆT for at bekræfte og gå til minutter.
- Juster minutter ved hjælp af UP og NED. Trykke SÆT for at bekræfte.
- Next, select the alarm source (FM, SD, USB, AUX). Use UP og NED to cycle through options. Press SÆT for at bekræfte.
- If FM is selected, use UP og NED to select a preset FM station (P01-P24).
- If SD or USB is selected, ensure a card/drive with audio is inserted. The alarm will play the first track.
- If AUX is selected, ensure an external device is connected and playing audio.
- Trykke SÆT igen for at aktivere alarmen. Et alarmikon vises på displayet.
- To deactivate the alarm, press SÆT indtil alarmikonet forsvinder.
- Når alarmen lyder, skal du trykke på SNOOZE / LYS button to activate snooze (typically 9 minutes). To turn off the alarm completely, press any other button.
Betjening af FM-radio
- Tryk på MODE knappen gentagne gange, indtil "FM" vises på displayet.
- Auto Scan and Preset: Tryk og hold på AFSPIL/PAUSE button. The radio will automatically scan for available stations and save them to presets (P01-P24).
- Manuel indstilling: Brug FORRIGE/NÆSTE SPOR knapper til at finjustere frekvensen.
- Valg af forudindstillinger: In FM mode, briefly press the FORRIGE/NÆSTE SPOR knapper til at bladre gennem gemte forudindstillede stationer.
- Juster lydstyrken ved hjælp af UP og NED buttons on the rear panel.
SD Card / USB Playback
- Insert an SD card into the SD card slot or a USB flash drive into the USB port on the rear panel.
- Tryk på MODE button repeatedly until "SD" or "USB" appears on the display. The device will automatically start playing audio files.
- Brug AFSPIL/PAUSE knappen for at pause eller genoptage afspilning.
- Brug FORRIGE/NÆSTE SPOR buttons on the top panel to skip tracks.
- Juster lydstyrken ved hjælp af UP og NED buttons on the rear panel.
Auxiliary Input (LINE IN)
- Connect an external audio device (e.g., smartphone, MP3 player) to the "LINE IN" (3.5mm) port on the rear panel using an audio cable (not included).
- Tryk på MODE knappen gentagne gange, indtil "AUX" vises på displayet.
- Start afspilning på din tilsluttede eksterne enhed.
- Juster lydstyrken ved hjælp af UP og NED buttons on the rear panel, and also control volume from your external device.
Displayets lysstyrke
Tryk kort på SNOOZE / LYS button on the top panel to cycle through different display brightness levels.
Opretholdelse
- Rensning: Use a soft, dry cloth to clean the surface of the alarm clock. Do not use abrasive cleaners, waxes, or solvents.
- Placering: Place the unit on a stable, flat surface. Avoid direct sunlight, high temperatures, humidity, or dusty environments.
- Magt: Tag strømadapteren ud af stikkontakten, hvis enheden ikke skal bruges i længere tid.
Fejlfinding
| Problem | Mulig årsag/løsning |
|---|---|
| Ingen strøm / Skærm slukket |
|
| Ingen lyd fra højttalerne |
|
| Dårlig FM-radiomodtagelse |
|
| Alarm does not sound or plays static |
|
| Display is too bright at night |
|
Specifikationer
| Mærke | Edifier |
| Modelnummer | MF240Reto |
| Display Type | LCD |
| Forbindelsesteknologi | AUX, USB |
| Særlige funktioner | Alarm, Radio, SD Card Reader, USB Playback |
| Strømkilde | Elektrisk med ledning |
| Materiale | Plast |
| Varens vægt | 0.74 pund (ca. 0.34 kg) |
| Fabrikant | Edifier USA |
Garanti og support
This Edifier product comes with a 2 års producentgaranti. For warranty claims, technical support, or further assistance, please contact Edifier USA customer service. Please retain your proof of purchase for warranty validation.
For de mest opdaterede supportoplysninger, besøg venligst den officielle Edifier webwebsted.