1. Introduktion
Tak for købetasing the Caliber RMD 068-2 Car Radio USB/SD Player. This manual provides detailed instructions for the installation, operation, and maintenance of your new car radio. Please read this manual thoroughly before using the product to ensure proper functionality and safety. Keep this manual for future reference.
2. Sikkerhedsoplysninger
- Installation: Ensure the unit is installed by a qualified technician to prevent damage to the vehicle's electrical system. Incorrect wiring can cause fire or electrical shock.
- Strømforsyning: Tilslut kun enheden til et 12V DC bilbatteri med negativ jord.
- Sikringer: Always replace fuses with new ones of the specified rating. Using an incorrect fuse can cause damage to the unit or vehicle.
- Lydstyrke: Do not operate the unit at excessively high volume levels, as this may impair your ability to hear external traffic sounds and could be dangerous.
- Rensning: Brug en blød, tør klud til rengøring. Brug ikke slibende rengøringsmidler eller opløsningsmidler.
- Fugtighed: Udsæt ikke enheden for fugt eller vand.
3. Pakkens indhold
Kontroller venligst, at alle varer er til stede:
- Caliber RMD 068-2 Car Radio Unit
- Aftageligt frontpanel
- ISO ledningsnet
- Monteringsramme
- Disassembly Keys (2 pcs)
- Brugervejledning (dette dokument)
4. Produktet er slutview
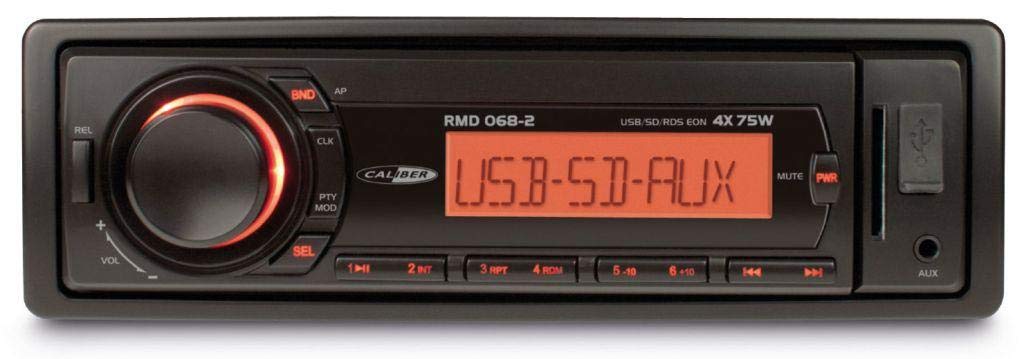
Figur 1: Forside view of the Caliber RMD 068-2 Car Radio. This image shows the main unit with its detachable front panel, including the display, control buttons, USB port, and SD card slot.
4.1 Betjeningselementer på frontpanelet
- TÆND/TILSTAND-knap: Press to turn on/off. Short press to switch between Radio, USB, SD, AUX modes.
- VOLUME knap: Rotate to adjust volume. Press to access audio settings (Bass, Treble, Balance, Fader).
- SKÆRM: Shows current time, radio frequency, track information, etc.
- USB-port: Tilslut USB-flashdrev til medieafspilning.
- SD-kortplads: Indsæt SD-kort for medieafspilning.
- AUX Input (3.5mm Jack): Tilslut eksterne lydenheder.
- BAND/AMS Button: In radio mode, press to select radio band (FM1, FM2, FM3). Long press for Automatic Memory Store.
- FORUDINDSTILLINGSknapper (1-6): Store and recall radio stations. In USB/SD mode, use for direct track selection.
- PLAY/PAUSE knap: Afspil eller sæt medieafspilning på pause.
- FORWARD/BACKWARD Buttons: Skip tracks or tune radio frequency.
- EJECT-knap: Release the detachable front panel.
4.2 Bagtilslutninger
The rear of the unit features standard ISO connectors for power and speakers, along with an antenna input.
- ISO Power Connector: For connecting to the vehicle's power supply (constant 12V, ignition 12V, ground).
- ISO Speaker Connector: For connecting to the vehicle's speakers (Front Left, Front Right, Rear Left, Rear Right).
- Antenneindgang: For connecting the car's radio antenna.
5. Opsætning
5.1 Installation
- Afbryd batteriet: Before starting, disconnect the negative terminal of your car battery to prevent short circuits.
- Fjern gammel enhed: Fjern forsigtigt din eksisterende bilradio fra instrumentbrættet.
- Installer monteringsramme: Insert the supplied mounting frame into the dashboard opening and bend the tabs to secure it.
- Tilslut ledninger: Refer to the wiring diagram in section 5.2. Connect the ISO wiring harness to the car's wiring and then to the Caliber RMD 068-2 unit. Connect the antenna cable.
- Slide Unit In: Carefully slide the Caliber RMD 068-2 unit into the mounting frame until it clicks into place.
- Gentilslut batteri: Tilslut den negative pol på dit bilbatteri igen.
- Fastgør frontpanel: Attach the detachable front panel to the main unit.
5.2 Ledningsdiagram
The Caliber RMD 068-2 uses standard ISO connectors. Ensure correct connections as shown below. If your vehicle does not have ISO connectors, an adapter may be required.
| Pin nr. | Wire Color (Typical) | Fungere |
|---|---|---|
| 4 | Gul | Konstant 12V (batteri) |
| 7 | Rød | Skiftet 12V (tænding) |
| 8 | Sort | Jord |
| 5 | Blå | Antenna Remote Out |
| Pin nr. | Wire Color (Typical) | Fungere |
|---|---|---|
| 1 | Lilla | Højre bag (+) |
| 2 | Lilla/sort | Højre bag (-) |
| 3 | Grøn | Bageste venstre (+) |
| 4 | Grøn/sort | Bageste venstre (-) |
| 5 | Grå | Forreste højre (+) |
| 6 | Grå/sort | Forreste højre (-) |
| 7 | Hvid | Forreste venstre (+) |
| 8 | Hvid/sort | Forreste venstre (-) |
Note: Wire colors may vary depending on vehicle manufacturer. Always consult your vehicle's wiring diagram.
6. Betjeningsvejledning
6.1 Grundlæggende funktioner
- Tænd/sluk: Tryk på POWER / MODE knappen for at tænde eller slukke for enheden.
- Lydstyrkekontrol: Drej på BIND med uret for at øge lydstyrken, mod uret for at sænke den.
- Valg af tilstand: Tryk kort på POWER / MODE button to cycle through available modes: Radio (FM), USB, SD, AUX.
- Lydindstillinger: Tryk på BIND knob to enter audio settings. Rotate the knob to select settings like BASS, TREBLE, BALANCE, FADER. Press the knob again to confirm or move to the next setting.
6.2 Radiodrift
- Bandvalg: I radiotilstand skal du trykke på BAND/AMS button to switch between FM1, FM2, and FM3 bands.
- Manuel indstilling: Tryk kort på FREM/BAGUD knapper til at finjustere frekvensen.
- Automatisk søgning: Tryk længe på FREM/BAGUD knapperne for automatisk at søge efter den næste station med stærke kanaler.
- Gem forudindstillinger: Tune to your desired station. Long press one of the FORUDINDSTILLING (1-6) buttons until you hear a beep. The station is now stored.
- Genkald forudindstillinger: Short press one of the FORUDINDSTILLING (1-6) buttons to recall a stored station.
- Automatisk hukommelseslagring (AMS): Tryk længe på BAND/AMS knappen for automatisk at scanne og gemme de stærkeste stationer i det aktuelle bånds forudindstillinger.
6.3 USB/SD-afspilning
- Indsæt medie: Sæt et USB-flashdrev i USB-porten eller et SD-kort i SD-kortstikket. Enheden skifter automatisk til USB/SD-tilstand og begynder afspilning.
- Afspil/pause: Tryk på AFSPIL/PAUSE knappen for at pause eller genoptage afspilning.
- Spring spor over: Tryk kort på FREM/BAGUD knapper for at springe til næste eller forrige spor.
- Hurtigt frem/tilbage: Tryk længe på FREM/BAGUD buttons to fast forward or rewind within a track.
- Mappenavigation: Brug FORUDINDSTILLING 5 og FORUDINDSTILLING 6 buttons to navigate between folders on your USB/SD media.
6.4 AUX-indgang
- Tilslut enhed: Connect your external audio device (e.g., smartphone, MP3 player) to the 3.5mm AUX input jack on the front panel using an audio cable.
- Vælg AUX-tilstand: Tryk på POWER / MODE button repeatedly until "AUX" is displayed.
- Styr afspilning: Control playback (play, pause, skip) directly from your connected external device. The car radio will control the volume.
7. Vedligeholdelse
- Rengøring af enheden: Use a soft, dry cloth to wipe the front panel and display. Do not use harsh chemicals, cleaning sprays, or abrasive cloths, as these can damage the surface.
- Detachable Front Panel: When detaching the front panel, handle it carefully. Store it in a protective case (if supplied) to prevent scratches or damage.
- USB/SD Ports: Hold USB-porten og SD-kortstikket fri for støv og snavs.
8. Fejlfinding
| Problem | Mulig årsag | Løsning |
|---|---|---|
| Ingen strøm | Sprunget sikring; Forkert ledningsføring; Løs forbindelse | Check and replace fuse; Verify wiring connections (Yellow to constant 12V, Red to ignition 12V, Black to ground); Ensure front panel is securely attached. |
| Ingen lyd | Volume too low; Mute activated; Incorrect speaker wiring; Damaged speakers | Increase volume; Check if mute is active; Verify speaker connections; Test with known good speakers. |
| Dårlig radiomodtagelse | Antenna not connected; Damaged antenna; Weak signal area | Ensure antenna is securely connected; Check antenna for damage; Try tuning to a stronger station or move to a different location. |
| USB/SD afspiller ikke | Ikke understøttet file format; Corrupted media; Incorrectly inserted media; Max capacity exceeded | Sikre files are MP3/WMA format; Try a different USB/SD card; Reinsert media correctly; Check media capacity (max 32GB recommended). |
| Front panel cannot be detached | Eject button not fully pressed; Mechanism jammed | Press the EJECT button firmly; Do not force the panel. |
If the problem persists after trying these solutions, please contact your dealer or a qualified service center.
9. Specifikationer
- Model: Caliber RMD 068-2
- Strømudgang: 4 x 75 Watts Max
- Strømforsyning: 12V DC (10.8V-15.6V), Negative Ground
- Sikring: 10A
- Understøttede lydformater: MP3, WMA (via USB/SD)
- USB/SD Compatibility: Op til 32 GB (FAT32-format)
- FM-tuner: RDS, 18 Presets
- AUX-indgang: 3.5 mm stereostik
- Detachable Front Panel: Ja
- Vægt: Cirka 0.95 kg (2.09 lbs)
10. Garanti og support
This Caliber product is covered by a warranty in accordance with applicable European laws. For detailed warranty terms and conditions, please refer to the warranty card included with your product or visit the official Caliber website. For technical support, troubleshooting assistance, or service inquiries, please contact your authorized Caliber dealer or the customer service department in your region. Please have your product model number (RMD 068-2) and proof of purchase ready when contacting support.
Note: Specifications and design are subject to change without notice for improvement.