
Indledning
The Skytech Smart Stat II/III remote control system is designed to provide a safe, reliable, and user-friendly control solution for gas heating appliances. This system allows for both thermostatic and manual operation of your fireplace from the remote transmitter.
The system operates using radio frequencies (RF) within a 20-foot range, utilizing non-directional signals. Each system is factory-programmed with one of 1,048,567 unique security codes. For initial use, the remote receiver's code must be matched to that of the transmitter.
Pakkens indhold
- Handheld remote control unit
- Remote receiver system (typically installed under the fireplace)
- Wiring for connecting the receiver to the valve
- Wall holster for the transmitter
- All necessary batteries for operation
- Full instruction manual (this document)

Billede 1: The Skytech Smart Stat II/III remote control and receiver unit. The remote is a black, rectangular device with a digital display and buttons, while the receiver is a compact black box with wiring connections.
Opsætning og installation
1. Receiver Placement and Battery Installation
The remote receiver is typically installed under the fireplace. Ensure it is placed in a location where it is protected from excessive heat and moisture, and where its wires can reach the gas valve connections.
- Open the battery compartment on the receiver.
- Isæt de nødvendige batterier, og overhold den korrekte polaritet.
- Luk batterirummet.
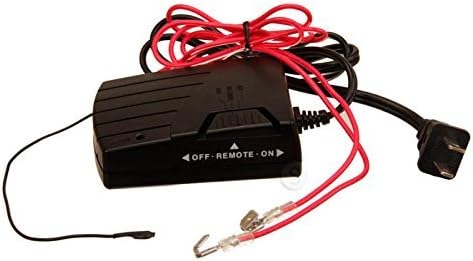
Billede 2: The remote receiver unit, a black rectangular box, showing the attached red and black wires for connection to the fireplace gas valve, and a standard power plug.
2. Wiring the Receiver to the Gas Valve
Connect the receiver to your gas heating appliance's valve using the provided wiring. The specific wiring method depends on your fireplace's valve type (millivolt or electronic spark ignition).
- For Millivolt Valves: Connect the two wires from the receiver to the "TH" and "TP" terminals on the millivolt gas valve. Ensure a secure connection.
- For Electronic Spark Ignitions: Connect the receiver according to the specific wiring diagram for electronic ignition systems, typically involving a transformer and the "TR" and "TH" terminals on the electronic module.

Billede 3: Et nærbillede view of the wire connectors, showing the spade terminals and clear plastic insulation, designed for secure attachment to valve terminals.
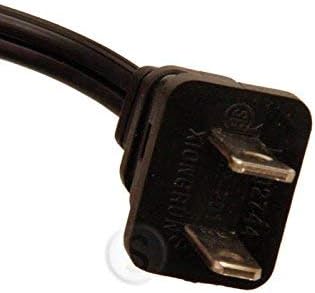
Billede 4: A standard two-prong power plug, typically used to power the receiver unit or a transformer for electronic ignition systems.

Billede 5: Diagram illustrating the wiring for millivolt gas valves. It shows the remote receiver connected to the terminal block on the gas valve, specifically to the "TH" and "TP" terminals, which are also connected to the thermopile/pilot light.
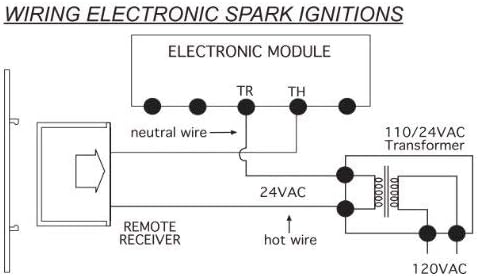
Billede 6: Diagram illustrating the wiring for electronic spark ignitions. It shows the remote receiver connected to an electronic module, which is powered by a 110/24VAC transformer. The receiver connects to the "TR" and "TH" terminals of the module.
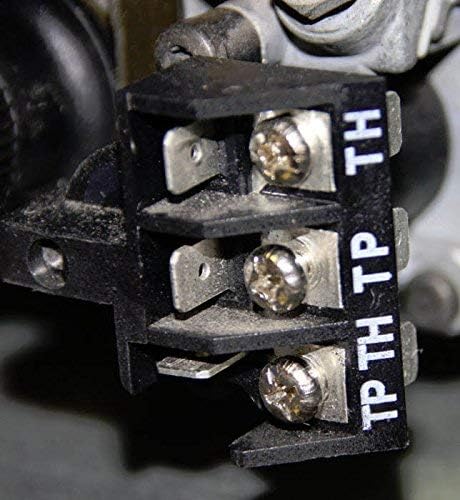
Billede 7: A close-up image of a gas valve terminal block, clearly labeled with "TH" and "TP" terminals, indicating where the receiver wires should be connected for millivolt systems.
3. Installation af senderbatteri
The handheld remote control unit requires batteries for operation.
- Open the battery compartment on the back of the remote transmitter.
- Insert the specified batteries (e.g., 2 AAA batteries), ensuring correct polarity.
- Luk batterirummet forsvarligt.
4. Matching Security Codes
Before initial use, the remote receiver's code must be matched to the transmitter's code. This ensures secure and interference-free operation.
- Ensure the receiver is powered on and connected to the fireplace.
- Locate the "LEARN" button on the remote receiver (refer to Image 2).
- Press and hold the "LEARN" button on the receiver until you hear a beep or see an indicator light flash.
- Within 10 seconds, press any button on the handheld remote transmitter.
- A confirmation beep or light flash from the receiver indicates successful code matching.
5. Wall Holster Installation
The provided wall holster allows for convenient storage of your remote transmitter.
- Choose a suitable location on a wall, away from direct heat and moisture.
- Use appropriate fasteners (screws, anchors) to secure the holster to the wall.
- Place the remote transmitter into the holster for storage.
Betjeningsvejledning
The Skytech Smart Stat II/III remote control offers both manual and thermostatic operating modes.
Manuel tilstand
In manual mode, you directly control the ON/OFF state of your fireplace.
- Tryk på ON button on the remote transmitter to turn the fireplace on.
- Tryk på SLUKKET button on the remote transmitter to turn the fireplace off.
Termostatisk tilstand
In thermostatic mode, the fireplace will automatically turn on or off to maintain a set temperature.
- Tryk på MODE button on the remote transmitter until "THERMO" or a similar indicator appears on the display.
- Brug UP og NED arrow buttons to set your desired temperature.
- The fireplace will activate when the room temperature falls below the set temperature and deactivate when it rises above it.
The remote system operates within a 20-foot range. Ensure no significant obstructions are between the transmitter and receiver for optimal performance.
Opretholdelse
Udskiftning af batteri
Replace batteries in both the remote transmitter and receiver when the low battery indicator appears on the remote display or if the system becomes unresponsive.
- Always use fresh, high-quality batteries of the specified type (e.g., AAA for the transmitter).
- Sørg for korrekt polaritet, når du isætter nye batterier.
- Bortskaf gamle batterier ansvarligt i henhold til lokale regler.
Rensning
Wipe the remote transmitter and receiver with a soft, dry cloth. Do not use abrasive cleaners or immerse units in water.
Fejlfinding
- Systemet svarer ikke:
- Check batteries in both the transmitter and receiver. Replace if necessary.
- Ensure the receiver is properly connected to the fireplace valve and receiving power.
- Verify that the security codes are matched (refer to "Matching Security Codes" in the Setup section).
- Ensure the remote is within the 20-foot operating range and there are no major obstructions.
- Fireplace Does Not Turn On/Off:
- Confirm the fireplace's pilot light is lit (for millivolt systems).
- Check the manual override switch on the receiver (if present) to ensure it's not in the "OFF" position.
- Undersøg ledningsforbindelserne for løse eller beskadigede.
- Thermostatic Mode Issues:
- Ensure the remote is set to "THERMO" mode.
- Verify the set temperature is appropriate for the desired operation.
- Check for drafts or heat sources near the remote that might affect temperature readings.
For further assistance, please contact Skytech customer support.
Specifikationer
| Feature | Detalje |
|---|---|
| Mærke | SkyTech |
| Modelnavn | Smart Stat II/III |
| Strømkilde | Batteridrevet |
| Materiale | Metal |
| Speciel funktion | Ergonomisk design |
| Driftsområde | Up to 20 feet (RF, non-directional) |
| Sikkerhedskoder | 1,048,567 unikke koder |
| Senderbatterier | 2 AAA-batterier påkrævet |
| Modtager batterier | (Typically 4 AA, check receiver for specifics) |
| Varens vægt | 14 ounce |
| UPC | 549849445448 |
Garantioplysninger
This Skytech Remote System comes with a Begrænset livstidsgaranti. Please refer to the detailed warranty terms provided in the original packaging or contact Skytech customer support for full details.
Kundesupport
For live assistance, technical support, or warranty inquiries, please contact Skytech's dedicated help line:
1-888 Help Line
(Please refer to your product packaging or Skytech's official website for the most current contact number if the above is not active.)


