
1. Introduktion
This manual provides detailed instructions for the installation, operation, and maintenance of your Foxconn TSAA725 ATX Tower Case. Please read this manual thoroughly before beginning installation to ensure proper setup and safe use of the product. Keep this manual for future reference.
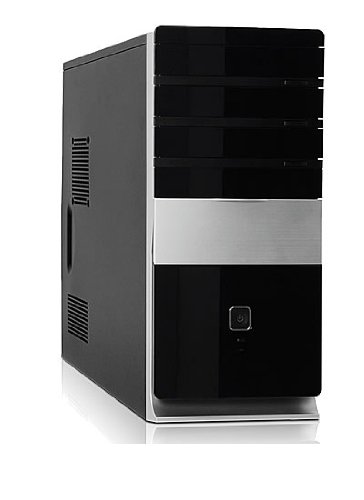
Billede: Forside view of the Foxconn TSAA725 ATX Tower Case, showcasing its design and front panel ports.
2. Sikkerhedsoplysninger
Overhold følgende sikkerhedsforanstaltninger for at forhindre skader på produktet eller personskade:
- Always disconnect the power supply from the wall outlet before opening the computer case or performing any installation/maintenance.
- Handle internal components with care to avoid electrostatic discharge (ESD) damage. Use an anti-static wrist strap if available.
- Sørg for tilstrækkelig ventilation omkring kabinettet for at forhindre overophedning.
- Do not expose the case to moisture or extreme temperatures.
- Hold små dele væk fra børn.
3. Pakkens indhold
Bekræft at alle varer er til stede i pakken:
- Foxconn TSAA725 ATX Tower Case
- 350W Power Supply (pre-installed)
- Tilbehørssæt (skruer, afstandsstykker, kabelbindere)
- Denne brugsanvisning
4. Nøglefunktioner
The Foxconn TSAA725 ATX Tower Case offers the following features:
- Materiale: 0.5mm SGCC Alloy Steel construction for durability.
- Bundkort support: Compatible with ATX and Micro ATX motherboards.
- Drive Bays:
- 3x 5.25" External Bays
- 2x 3.5" External Bays
- 4x 3.5" Internal Bays
- Kølesystem:
- 1x 80/92/120mm rear fan support (fan not included)
- Optional 1x 80/92/120mm front fan support (fan not included)
- 80mm Air Duct for CPU cooling.
- Front I/O panel:
- 2 x USB 2.0 porte
- 1x Hovedtelefonstik
- 1x Microphone jack
- Strømforsyning: Integrated 350W Power Supply.
5. Opsætning og komponentinstallation
Follow these steps to install your computer components into the Foxconn TSAA725 case:
- Forbered sagen:
Place the case on a flat, stable surface. Remove the side panel(s) by unscrewing the thumbscrews at the rear of the case and sliding the panel backward.
- Installer bundkort:
Install the necessary standoffs onto the motherboard tray according to your motherboard's form factor (ATX or Micro ATX). Carefully place the motherboard onto the standoffs, aligning the screw holes. Secure the motherboard with screws provided in the accessory kit.
- Install Drives (HDD/SSD):
For 3.5" internal drives, slide the drive into an available 3.5" internal bay and secure it with screws from the side. For 5.25" external drives (e.g., optical drives), remove the front panel bay cover, slide the drive in from the front, and secure it with screws.
- Installer udvidelseskort:
Remove the appropriate expansion slot covers at the rear of the case. Insert your graphics card or other expansion cards into the PCIe/PCI slots on the motherboard and secure them with screws.
- Tilslut kabler:
Connect the power supply cables to the motherboard (24-pin ATX, 4/8-pin CPU), graphics card (if applicable), and drives (SATA power). Connect the front panel cables (USB, audio, power switch, reset switch, LED indicators) to the corresponding headers on the motherboard. Refer to your motherboard manual for header locations.
- Kabelstyring:
Route cables neatly to improve airflow and aesthetics. Use cable ties from the accessory kit if needed.
- Luk sagen:
Once all components are installed and cables are connected, reattach the side panel(s) and secure them with the thumbscrews.
6. Betjeningsvejledning
After successful assembly, connect your peripherals (monitor, keyboard, mouse) and power cable to the case. Press the power button on the front panel to start your computer.
Frontpanel I/O-porte:
- USB 2.0-porte: Til tilslutning af USB-enheder såsom tastaturer, mus og ekstern lagring.
- Hovedtelefonstik: Til tilslutning af hovedtelefoner eller højttalere.
- Mikrofonstik: Til tilslutning af mikrofon.
- Power knap: Til at tænde eller slukke computeren.
- Nulstil knap: To restart the computer.
7. Vedligeholdelse
Regular maintenance helps ensure optimal performance and longevity of your computer case:
- Støvrensning: Periodically clean dust from inside the case, especially from fans and heatsinks, using compressed air. Ensure the computer is powered off and unplugged before cleaning.
- Udvendig rengøring: Tør ydersiden af kabinettet af med en blød, tør klud.amp klud. Undgå slibende rengøringsmidler eller opløsningsmidler.
- Kabelstyring: Kontroller jævnligt kabelføringen for at sikre, at ingen kabler blokerer luftstrømmen eller ventilatorens drift.
8. Fejlfinding
Hvis du støder på problemer, kan du bruge følgende almindelige løsninger:
- Computeren tænder ikke:
- Ensure the power cable is securely connected to both the case's power supply and the wall outlet.
- Check if the power supply switch (if present) is in the 'ON' position.
- Kontroller, at kablet til tænd/sluk-knappen på frontpanelet er korrekt tilsluttet bundkortet.
- Ingen visning på skærmen:
- Ensure the monitor is powered on and connected to the correct video output on your graphics card or motherboard.
- Sæt grafikkortet og RAM-modulerne i igen.
- USB-porte virker ikke:
- Kontroller, at USB-kablerne på frontpanelet er korrekt tilsluttet bundkortets USB-stik.
- Prøv at tilslutte enheden til en anden USB-port.
9. Specifikationer
| Feature | Detalje |
|---|---|
| Mærke | FOXCONN |
| Model | TSAA725-ISO450 |
| Materiale | 0.5mm SGCC Alloy Steel |
| Bundkort kompatibilitet | ATX, Micro ATX |
| Drevbåse (eksterne) | 3x 5.25", 2x 3.5" |
| Drevbåse (interne) | 4x 3.5" |
| Support til kølesystem | 1x 80/92/120mm rear fan, 1x 80/92/120mm front fan (optional), 80mm Air Duct |
| Front I / O-porte | 2x USB 2.0, 1x Headphone, 1x Microphone |
| Strømforsyning | 350W (Integrated) |
| Produktmål (LxBxH) | 50.17 x 24.13 x 54.61 cm |
| Varens vægt | 6.96 kg |
10. Garanti og support
For warranty information and technical support, please refer to the official Foxconn webwebstedet eller kontakt din lokale forhandler. Gem din købsbevis til garantikrav.
Online ressourcer: For additional support and updated drivers, visit the official Foxconn support page.
Bemærk: Garantibetingelserne kan variere afhængigt af regionen.