
1. Introduktion
This manual provides instructions for the installation, operation, and maintenance of your Orbit 27954 Pocket Star 4-Station Plus Indoor Sprinkler Controller. This controller is designed to manage residential 24-volt sprinkler systems, offering dual programming capabilities and a rain delay feature.
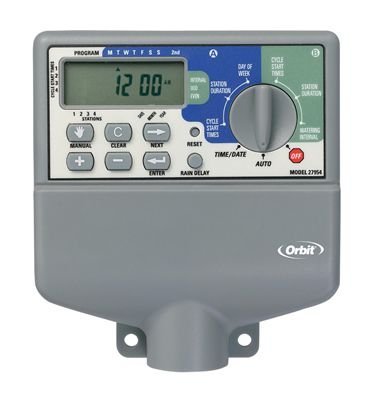
Image 1.1: The Orbit 27954 Pocket Star 4-Station Plus Indoor Sprinkler Controller. This image displays the front panel of the controller, featuring its digital display and control buttons.
2. Sikkerhedsoplysninger
Please read all instructions carefully before installation and operation. Failure to follow these instructions may result in property damage or personal injury.
- This controller is designed for indoor use only. Do not install outdoors or in areas exposed to water.
- Sørg for, at strømforsyningen er afbrudt, før du udfører nogen form for ledningsføring eller vedligeholdelse.
- All electrical wiring should comply with local codes and regulations. If you are unsure, consult a qualified electrician.
- Forsøg ikke at reparere enheden selv. Overlad al service til kvalificeret personale.
3. Opsætning
3.1 Udpakning
Carefully remove the controller from its packaging. Verify that all components are present. Retain packaging for future use or disposal.
3.2 Montering af controlleren
- Choose a suitable indoor location near a standard 120V AC outlet and away from direct sunlight or extreme temperatures.
- Use the provided mounting template (if applicable) or mark the desired screw locations on the wall.
- Install mounting screws into the wall, leaving the screw heads slightly extended.
- Hang the controller onto the screws using the keyhole slots on the back of the unit.
- Secure the controller by tightening the screws.
3.3 Ledningsføring
Vigtig: Afbryd strømmen før ledninger.
- Strømtilslutning: Plug the controller's power cord into a standard 120V AC outlet.
- Valve Wiring: Connect one wire from each sprinkler valve to a numbered terminal (1, 2, 3, 4) on the controller. Connect the common wire from all valves to the terminal labeled 'C' (Common).
- Sensor Wiring (Optional): If using a rain sensor, connect its wires to the designated sensor terminals. Refer to your sensor's manual for specific wiring instructions.
3.4 Indledende opstart
Once all wiring is complete and secure, connect the power cord to the electrical outlet. The controller display should illuminate, indicating it is powered on.
4. Betjeningsvejledning
4.1 Understanding the Display and Buttons
The controller features a digital display and several buttons for navigation and programming. Familiarize yourself with the 'Program', 'Set', 'Arrow' (up/down), and 'Rain Delay' buttons.
4.2 Indstilling af aktuel tid og dato
- Press the 'Set' button repeatedly until 'Set Time' appears on the display.
- Use the 'Arrow' buttons to adjust the hour, then press 'Set' to move to minutes.
- Repeat for minutes, AM/PM, year, month, and day.
4.3 Programmering af vandingsplaner
The controller supports dual programs (A and B) for flexible scheduling.
- Vælg program: Press the 'Program' button to select Program A or B.
- Indstil starttider: Press 'Set' until 'Start Time' appears. Use 'Arrow' buttons to set the desired start time for the first cycle. The controller supports multiple start times per program.
- Indstil kørselstider: Press 'Set' until 'Run Time' appears. Use 'Arrow' buttons to set the duration (in minutes) for each station (1-4).
- Indstil vandingsdage: Press 'Set' until 'Watering Days' appears. Use 'Arrow' buttons to select specific days of the week, odd/even days, or interval watering.
4.4 Manuel betjening
Sådan vander du en eller alle stationer manuelt:
- Press the 'Manual' button (if available, or follow specific manual run instructions in the display menu).
- Select the desired station or 'All Stations'.
- Set the run time using the 'Arrow' buttons.
- The selected station(s) will begin watering immediately.
4.5 Regnforsinkelsesfunktion
The rain delay feature allows you to pause watering for a set period without losing your programmed schedule.
- Press the 'Rain Delay' button.
- Use the 'Arrow' buttons to select the delay duration (e.g., 24, 48, or 72 hours).
- The controller will pause watering for the selected period and resume the schedule automatically afterward.
5. Vedligeholdelse
5.1 Rengøring
Tør controllerens yderside af med en blød, tør klud.amp klud. Brug ikke slibende rengøringsmidler eller opløsningsmidler, da disse kan beskadige displayet ellerasing.
5.2 Seasonal Considerations
As an indoor controller, the unit is not directly exposed to outdoor elements. However, ensure the indoor environment remains within recommended operating temperatures to prolong its lifespan.
6. Fejlfinding
| Problem | Mulig årsag | Løsning |
|---|---|---|
| Controllerens display er tomt. | Ingen strøm. | Check power outlet, ensure power cord is securely plugged in. Verify circuit breaker. |
| Sprinklerne tænder ikke. | Incorrect programming, wiring issue, or rain sensor activated. | Verify watering schedule. Check valve wiring connections. Ensure rain sensor is not active or bypassed. |
| Only some sprinklers turn on. | Faulty valve, wiring issue to specific station. | Check wiring for the non-working station. Test the valve manually. |
| Watering occurs at incorrect times. | Incorrect time/date setting or program schedule. | Verify current time and date. Review and adjust program start times and watering days. |
7. Specifikationer
- Model: Orbit 27954 Pocket Star 4-Station Plus Indoor Controller
- Mærke: Orbit
- Varenummer: 27954
- Antal stationer: 4
- Voltage: 24 volt (AC)
- Human Interface Input: Knapper
- Batterier påkrævet: Ingen
- Installation: Indendørs
- Funktioner: Dual program, Rain delay
- Pakkedimensioner: 21.84 x 13.46 x 6.6 cm
- Vægt: 226.8 g
8. Garanti og support
For garantioplysninger eller teknisk support henvises til den officielle Orbit-side. webwebstedet eller kontakt deres kundeserviceafdeling. Behold din købskvittering som købsbevis.