
1. Introduktion
This manual provides detailed instructions for the installation, operation, and maintenance of the ASUS M4A87TD EVO motherboard. This ATX motherboard supports AMD Phenom II, Athlon II, and Sempron 100 Series Processors with an AM3 socket, offering robust performance for personal computer systems. Key features include AMD 870 & SB850 chipset, DDR3 memory support, CrossFireX technology, SATA 6Gb/s, and USB 3.0 connectivity.
2. Opsætning og installation
Proper installation is crucial for the stable operation of your system. Follow these steps carefully.
2.1 Bundkortlayout ovenforview
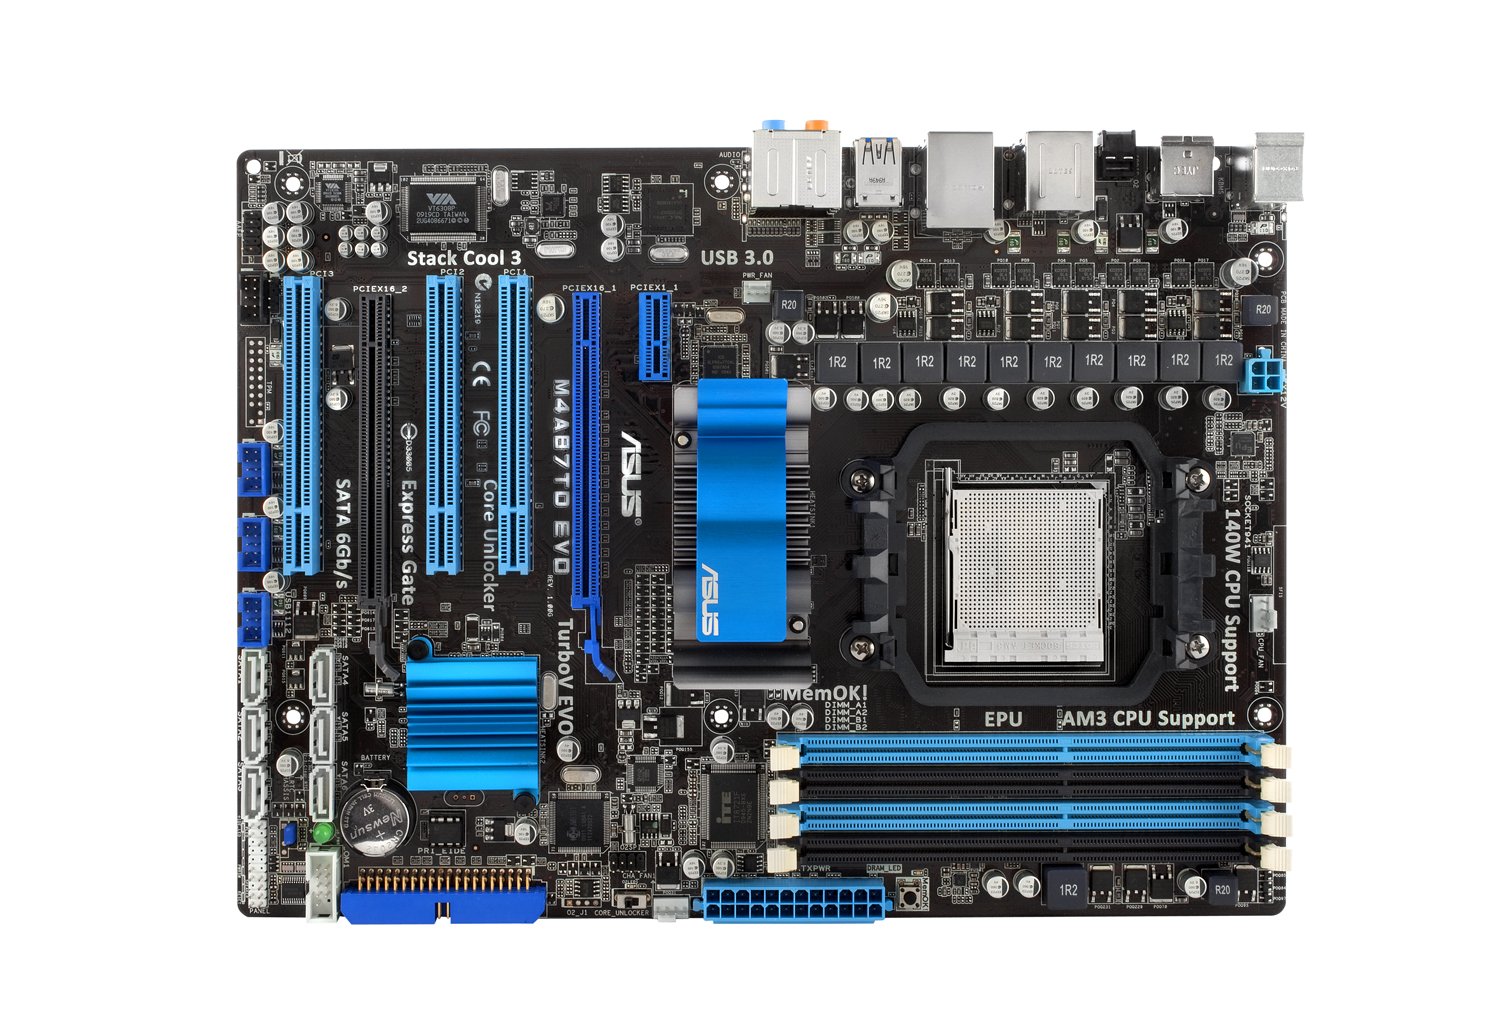
Figur 1: Fuld view of the ASUS M4A87TD EVO Motherboard, highlighting various components and connectors.
2.2 CPU installation
The motherboard features an AM3 socket for compatible AMD processors. Ensure the CPU is correctly oriented before placing it into the socket.
- Find CPU-stikket på bundkortet.
- Løft læssehåndtaget på siden af stikkontakten.
- Juster det trekantede mærke på CPU'en med det tilsvarende mærke på soklen.
- Placer forsigtigt CPU'en i soklen uden at tvinge den.
- Sænk belastningshåndtaget for at fastgøre CPU'en på plads.
Figur 2: Detaljeret view of the AM3 CPU socket area on the motherboard.
2.3 Installation af hukommelse (RAM)
The motherboard supports up to 16GB of DDR3 memory across four DIMM slots. For dual-channel operation, install memory modules in matched pairs.
- Åbn klipsene i begge ender af DIMM-stikket.
- Juster hakket på hukommelsesmodulet med nøglen i DIMM-stikket.
- Tryk godt ned i begge ender af hukommelsesmodulet, indtil klipsene klikker på plads.
Figur 3: View of the four DDR3 DIMM slots for memory installation.
2.4 Installation af udvidelseskort
The motherboard includes two PCI-Express 2.0 x16 slots (supporting ATI CrossFireX), one PCI-Express 2.0 x1 slot, and three PCI slots.
- Select an appropriate expansion slot for your card (e.g., graphics card in a PCIe x16 slot).
- Fjern det tilsvarende dæksel til stikkontakten fra computerens kabinet.
- Juster kortet med åbningen, og tryk godt ned, indtil det sidder på plads.
- Fastgør kortet til kabinettet med en skrue.
Figure 4: Expansion slots including PCI-Express x16, x1, and standard PCI slots.
2.5 Tilslutning af lagerenhed
Connect SATA 6Gb/s (SATA3) and SATA 3Gb/s (SATA2) devices to the available ports.
- Identify the SATA 6Gb/s ports (typically labeled SATA6G_1, SATA6G_2) and SATA 3Gb/s ports.
- Connect one end of the SATA data cable to the motherboard port and the other end to your storage device (HDD/SSD).
- Ensure the storage device also receives power from the power supply unit.
Figure 5: SATA 6Gb/s and SATA 3Gb/s ports for connecting storage devices.
2.6 Strømforbindelser
Connect the main 24-pin ATX power connector and the 4-pin ATX 12V power connector from your power supply unit to the motherboard.
- 24-bens ATX-strømstik: Provides main power to the motherboard.
- 4-pin ATX 12V Power Connector: Giver ekstra strøm til CPU'en.
2.7 Tilslutninger på bagsiden af I/O-panelet
Connect peripheral devices to the rear input/output ports.
- PS/2-porte: Til tastatur og mus.
- USB 2.0/3.0-porte: For various USB devices.
- eSATA2 Port: For external SATA devices.
- IEEE 1394 Ports: For FireWire devices.
- RJ45 LAN-port: Til netværksforbindelse.
- Audio I/O Jacks: For speakers, microphone, and other audio devices.
- Optical S/PDIF Out: Til digital lydudgang.
Figure 6: Rear I/O panel showing various connectivity options including USB 3.0, LAN, and audio ports.
3. Betjeningsvejledning
After successful hardware installation, proceed with system startup and software configuration.
3.1 Første opstart og BIOS-opsætning
- Tilslut din skærm, tastatur og mus.
- Tænd din computer.
- Tryk på DEL key during startup to enter the BIOS setup utility.
- Configure essential settings such as boot order, date, and time.
- Explore advanced features like Core Unlocker og TurboV EVO for performance tuning, if desired. Refer to the BIOS utility for detailed explanations of each setting.
- Gem ændringer og afslut BIOS.
3.2 Installation af operativsystem
Install your preferred operating system (e.g., Windows 10) from a bootable USB drive or optical disc.
3.3 Driverinstallation
Install the necessary drivers for the motherboard components, including chipset, LAN, audio, and USB 3.0 drivers. These are typically provided on a support DVD or available for download from the ASUS webwebsted.
4. Vedligeholdelse
Regular maintenance helps ensure the longevity and stability of your motherboard.
- Fjernelse af støv: Rengør bundkortet og komponenterne regelmæssigt med trykluft. Sørg for, at systemet er slukket og frakoblet, før rengøring.
- BIOS-opdateringer: Tjek ASUS-supporten website for the latest BIOS updates. Updating the BIOS can improve compatibility and system stability. Follow the instructions provided by ASUS carefully during the update process.
- Komponentkontroller: Ensure all cables and components are securely seated. Loose connections can lead to intermittent issues.
5. Fejlfinding
Dette afsnit omhandler almindelige problemer, du kan støde på.
- Systemet tænder ikke:
- Verify all power supply connections to the motherboard (24-pin ATX and 4-pin ATX 12V).
- Sørg for, at strømforsyningsenheden er tændt.
- Kontroller forbindelserne på frontpanelets strømafbryder til bundkortet.
- Ingen skærmoutput:
- Ensure the graphics card is properly seated in its PCIe slot and has adequate power.
- Check monitor connections and ensure the monitor is powered on and set to the correct input.
- If using integrated graphics (if available on your CPU/APU, though this board requires a discrete GPU), ensure the display cable is connected to the motherboard's video output.
- Memory (RAM) Issues:
- The motherboard features a DRAM LED that illuminates if there is an issue with memory detection.
- Reseat memory modules firmly in their slots.
- Test with one memory module at a time to identify a faulty stick or slot.
- Operating System Instability:
- Sørg for, at alle drivere er korrekt installeret og opdaterede.
- Check for overheating issues by monitoring CPU and chipset temperatures.
- Kør hukommelsesdiagnosticeringsværktøjer for at kontrollere for RAM-fejl.
- USB Ports Remain Powered After Shutdown:
- This is a known characteristic for some configurations. To fully power off USB devices, either toggle the power supply switch off and on, or unplug and replug the power cable from the wall.
6. Specifikationer
| Feature | Detalje |
|---|---|
| Mærke | ASUS |
| Modelnummer | M4A87TD EVO |
| CPU socket | Sokkel AM3 |
| Kompatible processorer | AMD Phenom II / Athlon II / Sempron 100 Series |
| Chipsættype | AMD 870 & SB850 |
| RAM-hukommelsesteknologi | DDR3 2000(O.C.)/1600/1333/1066 |
| Hukommelsespladser til rådighed | 4 (Dual Channel, ECC/Non-ECC Un-buffered) |
| Maksimal RAM-hukommelsesstørrelse | 16 GB |
| Grafikkort interface | PCI, PCI Express (2x PCIe 2.0 x16, 1x PCIe 2.0 x1, 3x PCI) |
| Understøttet systembusstandard | SATA 6Gb/s (SATA 3) |
| Total SATA Ports | 7 (6x SATA 6Gb/s, 1x eSATA2) |
| USB-porte | 12x USB 2.0 (6 bagpå, 6 via headere), 2x USB 3.0 (bagpå) |
| Antal Ethernet-porte | 1 (RTL8111E Gigabit LAN) |
| Lyd | 8-Channel HD Audio, Optical S/PDIF Out |
| Strømstik | 1x 24-pin ATX, 1x 4-pin ATX 12V |
| Platform | Windows 10 (kompatibel) |
| Varens vægt | 2.9 pund |
7. Garantioplysninger
The ASUS M4A87TD EVO motherboard comes with a 3 års garanti. For specific terms and conditions, please refer to the warranty card included with your product or visit the official ASUS support webwebsted.
8. Support
For teknisk assistance, download af drivere eller yderligere information, besøg venligst den officielle ASUS-support. website. You can typically find support resources by searching for your product model, M4A87TD EVO, on the ASUS webwebsted.
ASUS Officiel Webwebsted: https://www.asus.com/support/