
1. Introduktion
This manual provides detailed instructions for the installation, operation, and maintenance of your Planet Audio AC1200.2 2-Channel Car Amplifier. The AC1200.2 is a Class A/B amplifier designed to deliver high output audio performance for your vehicle's sound system. Please read this manual thoroughly before attempting installation or operation to ensure proper use and to prevent damage.

Billede 1.1: Forside view of the Planet Audio AC1200.2 2-Channel Car Amplivligere.
2. Sikkerhedsoplysninger
Forkert installation eller brug af dette amplifier can result in serious injury or damage to the unit or vehicle. Always adhere to the following safety guidelines:
- Professionel installation anbefales: For optimal performance and safety, professional installation by an authorized Planet Audio dealer is strongly recommended.
- Strømforbindelser: Ensure all power connections are secure and properly fused. Incorrect wiring can cause fire or electrical shock.
- Højttalerimpedans: Verify that the speaker impedance matches the amplifier's specifications (2 Ohm stable). Connecting speakers with lower impedance can damage the amplivligere.
- Ventilation: Monter amplifier in a location that allows for adequate air circulation to prevent overheating. Do not block cooling fins.
- Undgå fugt: Udsæt ikke ampmodstandsdygtig over for fugt eller vand.
- Afbryd batteriet: Frakobl altid bilens negative batteripol, inden du påbegynder elektrisk arbejde.
3. Produktfunktioner
The Planet Audio AC1200.2 amplifier incorporates several features designed for enhanced audio performance and reliability:
- Strømudgang: Delivers 600 Watts Max x 2 @ 2 Ohms, 300 Watts Max x 2 @ 4 Ohms, and 1200 Watts Max Bridged x 1 @ 4 Ohms.
- Class A/B Topology: Utilizes Class A/B amplifier design, balancing efficiency and sound quality.
- Full Range Operation: Capable of powering both full-range speakers and subwoofers.
- Variable Gain Control: Allows adjustment of the input signal level to match the output of your head unit.
- Low & High Level Inputs: Supports both RCA (low-level) and speaker wire (high-level) input signals.
- Variable High-Pass Crossover: Filters out low frequencies to protect speakers and improve sound clarity.
- Bridgebar: Enables combining two amplifier channels for increased power output to a single speaker or subwoofer.
- MOSFET strømforsyning: Features a robust MOSFET power supply for efficient and stable power delivery.
- 2 Ohm Stabil: Designed to operate safely with speaker loads down to 2 Ohms per channel.
- Kort beskyttelse: Built-in circuitry protects the amplifier from short circuits.
- Switchable Input Sensitivity: Provides flexibility for matching various head unit output levels.
- Fjernbetjening af subwooferniveau: Allows convenient adjustment of subwoofer output from the driver's seat.

MOSFET strømforsyning

Variable LP Filter

Variabel basforstærkning

2 Ohm stabil

Kort beskyttelse

Switchable Input Sensitivity

Remote Sub Control

Brobar
4. Installation
4.1 Tjekliste før installation
- Sørg for, at køretøjets batteri er frakoblet.
- Gather all necessary tools and wiring materials (power wire, ground wire, remote turn-on wire, speaker wire, RCA cables, fuse holder, fuse).
- Planlæg amplifier mounting location, ensuring adequate ventilation and protection from moisture.
4.2 Montering af Amplivligere
Choose a secure, dry location with sufficient airflow. Avoid mounting on carpet or in enclosed spaces without ventilation. Use the provided mounting hardware to secure the amplifier firmly to a solid surface in the vehicle.
4.3 Ledningsforbindelser
Refer to the wiring diagram below for proper connection of power, ground, remote turn-on, and speaker wires.

Billede 4.1: Overview of amplifier tilslutninger.
4.3.1 Strømtilslutning (+12V)
- Connect a heavy gauge power cable (e.g., 4-gauge) directly from the positive terminal of the vehicle's battery to the +12V terminal on the amplivligere.
- Install an in-line fuse holder with an appropriate fuse (e.g., 75 Amps) within 18 inches (45 cm) of the battery.
4.3.2 Jordforbindelse (GND)
- Connect a heavy gauge ground cable (e.g., 4-gauge) from the GND terminal on the amplifier to a clean, unpainted metal surface of the vehicle's chassis.
- Ensure the ground point is free of paint, rust, or dirt for a good electrical connection.
4.3.3 Fjerntændingsforbindelse (REM)
- Connect a smaller gauge wire (e.g., 18-gauge) from the remote turn-on output of your head unit to the REM terminal on the amplivligere.
- This wire signals the amplifier til at tænde og slukke med hovedenheden.
4.3.4 Højttalerforbindelser
- Connect your speakers to the SPEAKER CONNECTIONS terminals.
- For stereo operation, connect one speaker to the L+ and L- terminals and another to the R+ and R- terminals.
- For bridged mode (mono operation for a subwoofer), connect the subwoofer to the L+ and R- terminals. Ensure the subwoofer impedance is 4 Ohms for bridged mode.
4.3.5 Input Connections (RCA or High-Level)
- RCA Inputs (Low-Level): Connect RCA cables from the head unit's RCA outputs to the INPUTS R and L jacks on the amplivligere.
- Input på højt niveau: If your head unit does not have RCA outputs, use the HIGH LEVEL INPUTS. Connect the speaker wires from the head unit to the corresponding terminals.
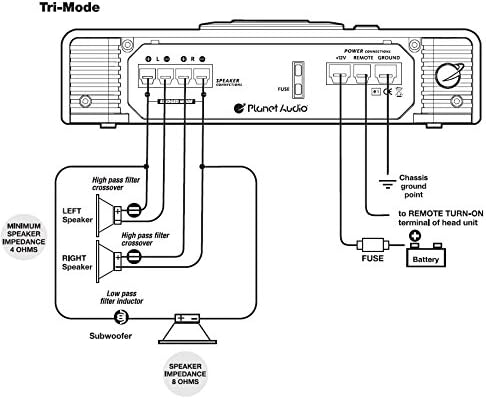
Image 4.2: Tri-Mode wiring diagram for speaker and subwoofer connections.
5. Betjeningsknapper
The AC1200.2 amplifier features several controls for fine-tuning your audio system. These controls are located on the amplifier's input panel.

Billede 5.1: Amplifier control panel showing input and crossover adjustments.
5.1 Indgangskontrol
- SENSITIVITY (Gain Control): Denne knap justerer indgangsfølsomheden for ampvæske, der matcher udgangsvolumenettage of your head unit. Start with the gain at minimum and slowly increase it until the desired volume is achieved without distortion. This is not a volume control.
- BASS BOOST: Adjusts the bass level at a specific frequency. Use sparingly to avoid distortion.
5.2 Crossover Controls
- MODE Switch (FULL/HPF/LPF): Selects the operating mode for the crossover filter.
- FULD: Full range audio signal passes through.
- HPF (Højpasfilter): Allows frequencies above the set point to pass through. Useful for full-range speakers to prevent low-frequency distortion.
- LPF (lavpasfilter): Tillader frekvenser under sætpunktet at passere igennem. Essentielt for subwoofere.
- HIGH PASS FREQ: Adjusts the cutoff frequency for the High Pass Filter.
- LOW PASS FREQ: Adjusts the cutoff frequency for the Low Pass Filter.
5.3 Remote Subwoofer Level Control
The included remote subwoofer level control allows you to adjust the subwoofer output from your listening position. Connect it to the 'REMOTE SUBWOOFER LEVEL CONTROL' port on the ampved hjælp af det medfølgende kabel.

Image 5.2: Remote Subwoofer Level Control unit.
6. Specifikationer
The following table outlines the technical specifications for the Planet Audio AC1200.2 amplivligere:
| Specifikation | Værdi |
|---|---|
| Varedimensioner (L x B x H) | 12 x 10 x 2.4 tommer |
| Voltage | 16 volt |
| Monteringstype | Overflademontering |
| Antal kanaler | 2 |
| Udgangseffekt | 1200 watt (maksimum) |
| Forsyningsstrøm | 75 Amps |
| Materiale | Aluminiumslegering |
| Varens vægt | 7.5 pund |
| Farve | Sort |
7. Fejlfinding
Hvis du oplever problemer med din amplifter, se følgende fejlfindingsvejledning:
- Ingen strøm:
- Check the in-line fuse near the battery. Replace if blown.
- Verify all power, ground, and remote turn-on connections are secure and properly wired.
- Ensure the remote turn-on wire is receiving +12V from the head unit when it is on.
- Ingen lyd:
- Bekræft amplifier is powered on (power indicator light is illuminated).
- Check all RCA or high-level input connections from the head unit to the amplivligere.
- Kontroller højttalerledningernes forbindelser på begge amplifier og højttalerne.
- Adjust the gain control. Ensure it is not set to minimum.
- Check head unit settings (volume, fader, balance).
- Forvrænget lyd:
- Reduce the gain control setting. Excessive gain can cause distortion.
- Kontroller højttalerimpedansen. Sørg for, at den er inden for amplifier's acceptable range.
- Verify speaker wires are not shorted or touching the vehicle chassis.
- Adjust Bass Boost settings. High bass boost can cause distortion.
- Amplifier Overheating / Protection Mode:
- Sørg for amplifier has adequate ventilation. Clear any obstructions around the cooling fins.
- Check speaker impedance. Running speakers below the minimum recommended impedance (e.g., below 2 Ohms stereo or 4 Ohms bridged) can cause overheating.
- Verify power and ground wire gauge is sufficient for the amplifiers udgangseffekt.
- Reducer forstærkningsindstillingen.
8. Vedligeholdelse
To ensure the longevity and optimal performance of your Planet Audio AC1200.2 ampLifier, følg disse enkle vedligeholdelsesretningslinjer:
- Rensning: Tør regelmæssigt af ampRengør ydersiden af apparatet med en blød, tør klud. Undgå at bruge skrappe kemikalier eller slibende rengøringsmidler.
- Ventilation: Kontroller regelmæssigt, at amplifier's cooling fins are free from dust, dirt, or obstructions. Ensure proper airflow around the unit.
- Tilslutningstjek: Occasionally inspect all wiring connections (power, ground, remote, speaker, RCA) to ensure they remain tight and free from corrosion.
- Miljøbeskyttelse: Behold amplifier away from direct sunlight, extreme temperatures, and moisture.
9. Garanti og support
Planet Audio tilbyder en 6 års platingaranti online fra forhandlere for this product when purchased through Amazon.com. This warranty covers defects in materials and workmanship under normal use.
For technical support, warranty claims, or further assistance, please contact Planet Audio customer service or visit their official website. It is recommended to have your purchase details and product model number (AC1200.2) available when seeking support.