
1. Introduktion
This manual provides detailed instructions for the safe and efficient use of your Vivitar VIVICAM-7340RED 7.0MP Digital Camera. Please read this manual thoroughly before operating the camera and keep it for future reference. Your camera is designed for capturing high-quality still images and video recordings with ease.
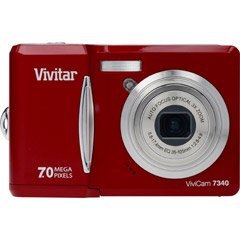
Figur 1: Forside view of the Vivitar VIVICAM-7340RED Digital Camera. This image shows the lens, flash, and the overall compact design of the camera.
2. Opsætning
2.1. Isætning af batterier
- Find batteridækslet på bunden eller siden af kameraet.
- Skub låsen for at åbne dækslet.
- Insert the required batteries (typically AA or AAA, refer to packaging) according to the polarity indicators (+ and -) inside the compartment.
- Luk batteridækslet ordentligt, indtil det klikker på plads.
Note: Ensure batteries are inserted with correct polarity as indicated inside the compartment.
2.2. Indsættelse af et hukommelseskort
Your camera requires a compatible memory card (e.g., SD card) to store photos and videos. The memory card slot is usually located near the battery compartment or on the side of the camera.
- Åbn dækslet til hukommelseskortet.
- Insert the memory card with the metal contacts facing the correct direction (refer to the diagram near the slot). Push gently until it clicks into place.
- Luk dækslet til hukommelseskortet.
Note: Do not force the memory card. If it does not insert easily, check its orientation.
2.3. Tænd/sluk
- For at tænde kameraet skal du trykke på MAGT button. The LCD screen will illuminate.
- To turn off the camera, press and hold the MAGT knappen igen, indtil LCD-skærmen slukker.
2.4. Indledende indstillinger (dato og klokkeslæt)
Upon first use or after battery replacement, you may need to set the date and time. Follow the on-screen prompts or navigate to the MENU > OPSÆTNING > DATO/TID option to adjust these settings.
3. Betjening af kameraet
3.1. Optagelse af stillbilleder
- Turn on the camera. Ensure it is in photo capture mode (usually indicated by a camera icon on the LCD).
- Komponer dit billede ved hjælp af den 2.4-tommer LCD-skærm.
- Press the shutter button halfway down to allow the camera to focus. A green frame or beep typically indicates focus lock.
- Tryk udløserknappen helt ned for at tage billedet.
3.2. Brug af optisk zoom
Your camera features a 3x optical zoom. Use the zoom lever (often located around the shutter button) to zoom in or out. Optical zoom adjusts the lens elements to magnify the subject without losing image quality.
- Push the zoom lever towards T (Telefoto) for at zoome ind.
- Push the zoom lever towards W (Bred) for at zoome ud.
The camera also has a 5x digital zoom, which can be accessed after reaching the maximum optical zoom. Digital zoom digitally enlarges the image, which may result in reduced image quality.
3.3. Optagelse af videoer
- Switch the camera to video recording mode (usually via a mode dial or menu option).
- Press the shutter button to start recording. A red dot or timer on the LCD indicates recording is in progress.
- Tryk på udløserknappen igen for at stoppe optagelsen.
3.4. Viewpå fotos og videoer
- Tryk på AFSPILNING knappen (ofte angivet med et afspilningsikon).
- Use the directional buttons to navigate through your captured images and videos.
- To play a video, select it and press the OK or SPIL knap.
3.5. Overførsel Files to a Computer (PictBridge)
Your camera is PictBridge compatible, allowing direct printing to compatible printers. For transferring files til en computer:
- Tilslut kameraet til din computer ved hjælp af det medfølgende USB-kabel.
- Turn on the camera. It should appear as a removable disk or device on your computer.
- Open the camera's folder and copy the desired photos and videos to your computer.
- Tag kameraet sikkert ud af computeren, før du frakobler USB-kablet.
4. Vedligeholdelse
4.1. Rengøring af kameraet
- Linse: Use a soft, lint-free cloth specifically designed for camera lenses. Gently wipe in a circular motion. Avoid using harsh chemicals.
- LCD skærm: Wipe with a soft, dry cloth. For stubborn smudges, a slightly damp cloth (water only) can be used, followed by a dry wipe.
- Kamerahus: Brug en blød, tør klud til at tørre støv og fingeraftryk væk.
Do not use solvents, alcohol, or abrasive cleaners on any part of the camera.
4.2. Batteripleje
- Fjern batterierne, hvis kameraet ikke skal bruges i længere tid, for at forhindre lækage.
- Brug kun de anbefalede batterityper.
- Bortskaf gamle batterier ansvarligt i henhold til lokale regler.
4.3. Opbevaring
Store the camera in a cool, dry place away from direct sunlight, extreme temperatures, and high humidity. Use the included case for protection during transport.
5. Fejlfinding
| Problem | Mulig årsag | Løsning |
|---|---|---|
| Kameraet tænder ikke. | Døde eller forkert isatte batterier. | Udskift batterierne, eller sørg for, at de er isat med den korrekte polaritet. |
| Billederne er slørede. | Kamerarystelser, ude af fokus eller snavset objektiv. | Hold camera steady, ensure focus is achieved before shooting, clean the lens. |
| Meddelelsen "Hukommelseskortfejl". | Kortet er ikke isat korrekt, beskadiget eller fuldt. | Sæt kortet i igen, prøv et andet kort, eller slet det files for at frigøre plads. |
| Blitzen udløses ikke. | Flash mode set to OFF, or batteries low. | Kontrollér blitzindstillingerne i menuen, og udskift batterierne. |
6. Specifikationer
| Feature | Detalje |
|---|---|
| Mærke | Vivitar |
| Modelnummer | VIVICAM-7340RED |
| Effektiv stillopløsning | 7 MP |
| Optisk zoom | 3x |
| Digital Zoom | 5x |
| LCD skærmstørrelse | 2.4 tommer |
| Videooptagelse | Op til 640 x 480 ved 30 fps |
| Billedopløsning | Op til 3072 x 2304 |
| Autofokus | Ja |
| PictBridge Compatible | Ja |
| Strømkilde | Batterier (medfølger) |
| Farve | Rød |