
1. Introduktion
This manual provides essential information for the safe and efficient use of the Finder 80.01.0.240.0000 Multifunction Time Delay Relay. This device is designed for precise timing control in various applications, offering multiple functions and a wide time range. Please read this manual thoroughly before installation and operation.
2. Opsætning og installation
Proper installation is crucial for the reliable operation of the time delay relay. Ensure all power is disconnected before proceeding with installation.
2.1 Produkt overview

Figur 1: Forside view of the Finder 80.01.0.240.0000 Time Delay Relay, showing the time setting dial, function selector, and terminal markings.
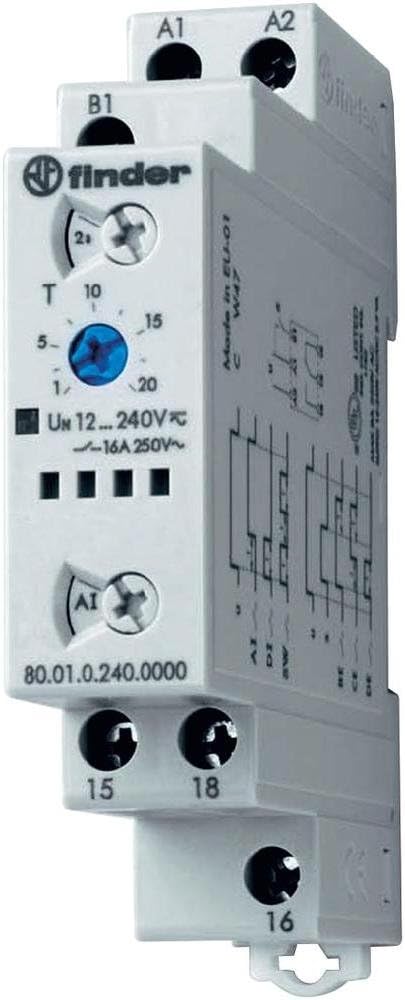
Figur 2: Vinklet view of the Finder 80.01.0.240.0000 Time Delay Relay, illustrating its compact design and DIN rail compatibility.
2.2 Montering
The Finder 80.01.0.240.0000 relay is designed for DIN rail mounting. Securely attach the relay to a standard 35mm DIN rail in an appropriate enclosure, ensuring adequate ventilation.
2.3 Ledningsføring
Refer to the wiring diagrams below for correct electrical connections. Ensure all connections are tight and conform to local electrical codes.

Figure 3: Wiring diagrams for the Finder 80.01.0.240.0000 Time Delay Relay. The left diagram shows basic connection for terminals A1, A2, 15, 16, 18. The right diagram includes an external control input 'S' at terminal B1.
- Strømforsyning (A1, A2): Tilslut kontrolvolumentage (12-240V AC/DC) to terminals A1 and A2.
- Kontrolindgang (B1): For functions requiring an external control signal, connect the signal to terminal B1.
- Udgangskontakter (15, 16, 18): These are changeover contacts. Terminal 15 is the common, 16 is normally closed (NC), and 18 is normally open (NO). Connect your load circuit to these terminals.
2.4 Indledende konfiguration
Before applying power, set the desired time range and function using the rotary selectors on the front of the unit. The time range can be set up to 24 hours. Consult the product datasheet for specific function definitions.
3. Betjeningsvejledning
Once installed and configured, the relay operates automatically based on the selected function and time settings.
3.1 Funktionsvalg
Rotate the function selector switch to choose the desired timing mode (e.g., ON-delay, OFF-delay, flasher). Refer to the product's technical specifications for a complete list of available functions and their descriptions.
3.2 Tidsindstilling
Use the time setting dial to adjust the delay period within the selected time range. The dial typically has markings for common time values. Fine-tuning may be required for precise applications.
3.3 Statusindikatorer
The relay features an LED indicator. This LED typically blinks during the timing phase and illuminates steadily when the output relay is energized, providing visual feedback on the operational status.
4. Vedligeholdelse
The Finder 80.01.0.240.0000 time delay relay is designed for long-term, maintenance-free operation. However, periodic checks can ensure optimal performance.
- Rensning: Keep the relay free from dust and debris. Use a dry, soft cloth for cleaning. Do not use solvents or abrasive cleaners.
- Tilslutningstjek: Kontrollér ledningsforbindelserne regelmæssigt for at sikre, at de forbliver fastgjorte og fri for korrosion.
- Miljøforhold: Sørg for, at driftsmiljøet forbliver inden for de angivne temperatur- og fugtighedsområder for at forhindre for tidlig fejl.
5. Fejlfinding
If the relay does not operate as expected, perform the following basic checks:
- Ingen strøm: Verify that the control voltage is correctly applied to terminals A1 and A2 and is within the specified range (12-240V AC/DC). Check fuses or circuit breakers.
- Forkert timing: Confirm that the time range and time setting dials are correctly configured for the desired delay.
- Udgang skifter ikke: Check the load connections to terminals 15, 16, and 18. Ensure the load is within the relay's contact rating (16A 250V~). Verify the selected function is appropriate for the application.
- Control Signal Issue: If using an external control signal (B1), ensure it is correctly applied and within specifications.
- LED-indikator: Observe the LED behavior. A continuously off LED may indicate no power, while an unexpected blinking pattern might suggest a fault or incorrect function selection.
If issues persist after these checks, consult a qualified electrician or contact Finder technical support.
6. Tekniske specifikationer
The following table details the key technical specifications for the Finder 80.01.0.240.0000 Multifunction Time Delay Relay.
| Feature | Specifikation |
|---|---|
| Modelnummer | 80.01.0.240.0000 |
| Mærke | Finder |
| Forsyning Voltage | 12-240V AC / DC |
| Output kontakt bedømmelse | 16A 250V~ |
| Tidsområde | Up to 24 hours (max) |
| Antal indstillinger | 6 (Functions) |
| Materiale | Polycarbonat |
| Farve | Hvid |
| Produktmål (D x B x H) | 3.5" x 0.69" x 2.39" (88.8 mm x 17.5 mm x 60.8 mm) |
| Varens vægt | 4.54 g |
6.1 Dimensioner

Figure 4: Dimensional drawing of the Finder 80.01.0.240.0000 Time Delay Relay, showing measurements in millimeters for installation planning.
7. Garanti og support
7.1 Garantioplysninger
Finder products are manufactured to high standards and are typically covered by a manufacturer's warranty against defects in materials and workmanship. For specific warranty terms and duration, please refer to the documentation provided with your purchase or contact Finder directly.
7.2 Teknisk support
For technical assistance, product inquiries, or support, please visit the official Finder website or contact their customer service department. Ensure you have your product model number (80.01.0.240.0000) available when seeking support.