
1. Introduktion
Thank you for choosing the Casio PQ-31-1EF Digital Wake Up Timer. This manual provides detailed instructions for the proper setup, operation, and maintenance of your new digital alarm clock. Please read this manual thoroughly before using the product to ensure correct usage and to prevent damage.
2. Sikkerhedsforanstaltninger
- Udsæt ikke enheden for ekstreme temperaturer, direkte sollys eller høj luftfugtighed.
- Undgå at tabe enheden eller udsætte den for kraftige stød.
- Forsøg ikke at skille enheden ad eller ændre den. Dette vil ugyldiggøre garantien.
- Opbevar batterier utilgængeligt for børn. Søg straks læge ved indtagelse.
- Bortskaf brugte batterier i henhold til lokale regler.
3. Pakkens indhold
Kontroller venligst, at alle varer er til stede i din pakke:
- 1 x Casio PQ-31-1EF Digital Wake Up Timer
- 2 x Lithium Metal batteries (pre-installed or included separately)
- 1 x Brugermanual (dette dokument)
4. Produktet er slutview
The Casio PQ-31-1EF is a compact digital alarm clock designed for reliability and ease of use. It features a clear digital display, an integrated alarm function, and a light for visibility in low-light conditions. The sturdy case provides impact resistance for daily use.
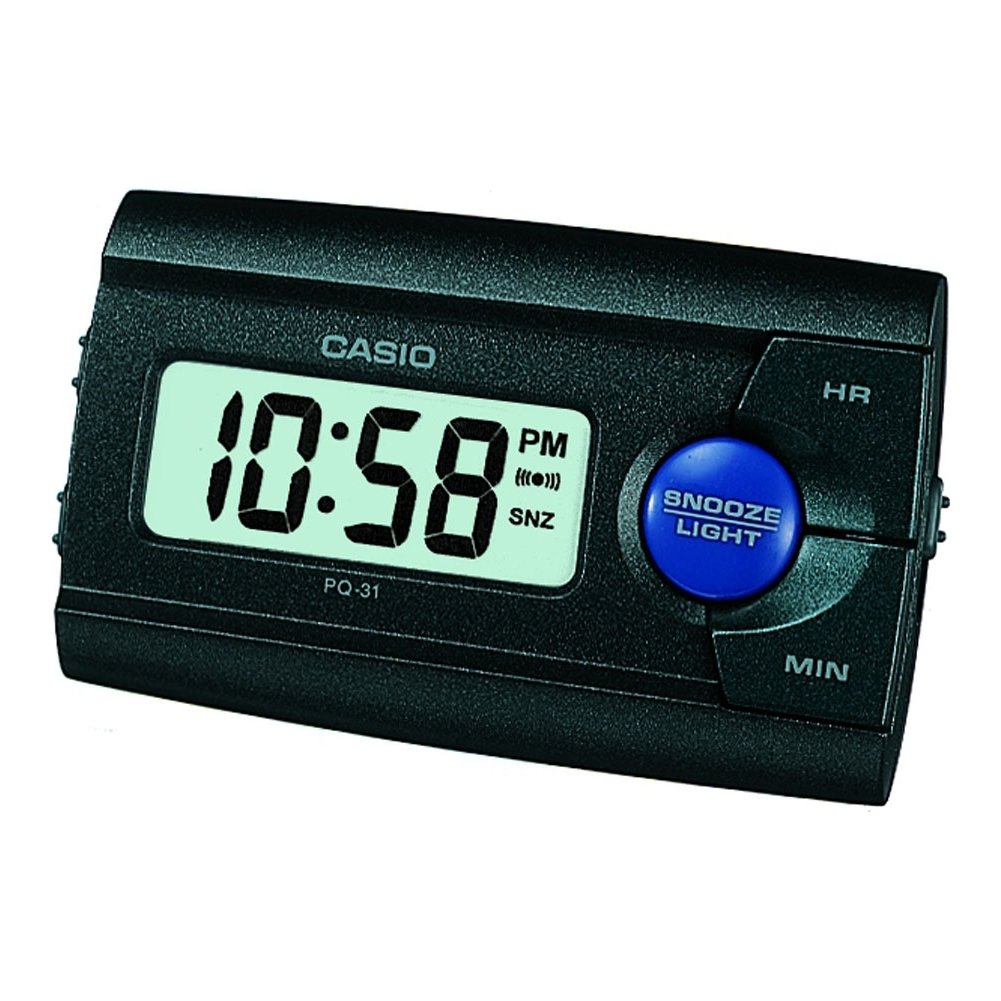
Figur 1: Forside view of the Casio PQ-31-1EF Digital Wake Up Timer. Shows the digital display and general shape of the device.
Button Functions (Typical Layout - Refer to actual device for exact labels):
- MODE/SET-knap: Used to switch between time, alarm, and timer modes, and to confirm settings.
- ADJUST/+/H Button: Used to increase values (hours) or move forward in settings.
- ADJUST/-/M Button: Used to decrease values (minutes) or move backward in settings.
- LIGHT -knap: Activates the backlight for a few seconds.
- ALARM TIL/FRA-knap: Slår alarmfunktionen til/fra.
- SNOOZE knap: Temporarily silences the alarm and activates snooze function.
5. Opsætning
5.1 Batteriinstallation
Your Casio PQ-31-1EF requires 2 Lithium Metal batteries. These are typically included with the product.
- Find batteridækslet på bagsiden eller undersiden af enheden.
- Open the cover by sliding it or unscrewing it (if applicable).
- Insert the 2 Lithium Metal batteries, ensuring the positive (+) and negative (-) terminals are aligned correctly according to the diagram inside the compartment.
- Sæt batterirummets dæksel på igen.
The clock display should now activate. If not, check battery orientation or replace with fresh batteries.
5.2 Indstilling af starttidspunkt
- I normal tidsvisningstilstand skal du trykke på og holde nede MODE/SET button for a few seconds until the hour digits begin to flash.
- Brug ADJUST/+ or ADJUST/- buttons to set the correct hour. Pay attention to AM/PM indicators if your clock uses a 12-hour format.
- Tryk på MODE/SET button again to move to the minute setting. The minute digits will flash.
- Brug ADJUST/+ or ADJUST/- knapperne for at indstille de korrekte minutter.
- Tryk på MODE/SET button one more time to exit the time setting mode. The time will now be set.
6. Betjeningsvejledning
6.1 Indstilling af alarmen
The daily alarm reminds you of events that recur every day.
- Fra den normale tidsvisning skal du trykke på MODE/SET button once to enter alarm setting mode. The alarm time will be displayed, and the hour digits may flash.
- Brug ADJUST/+ or ADJUST/- knapperne for at indstille den ønskede alarmtime.
- Tryk på MODE/SET button again to move to the minute setting.
- Brug ADJUST/+ or ADJUST/- knapperne til at indstille de ønskede alarmminutter.
- Tryk på MODE/SET button one more time to confirm the alarm setting and return to normal time display.
6.2 Aktivering/deaktivering af alarmen
To turn the alarm ON or OFF, locate the ALARM TIL / FRA switch (usually on the side or back of the unit) and slide it to the desired position. An alarm icon will typically appear on the display when the alarm is active.
6.3 Brug af snooze-funktionen
Når alarmen lyder, skal du trykke på SLUM button (often a large button on top of the unit). The alarm will temporarily stop and sound again after a few minutes (typically 5-10 minutes, depending on the model).
6.4 Brug af baggrundslyset
To illuminate the clock face in dark environments, press the LYS button. The light-emitting diode (LED) will illuminate the display for a short period, then automatically turn off.
7. Vedligeholdelse
7.1 Rengøring af enheden
To clean the Casio PQ-31-1EF, wipe it gently with a soft, dry cloth. Do not use abrasive cleaners, solvents, or chemical sprays, as these can damage the casing og display.
7.2 Udskiftning af batteri
When the display becomes dim or the clock functions erratically, it is time to replace the batteries. Follow the steps in Section 5.1 Battery Installation to replace the 2 Lithium Metal batteries. Ensure proper disposal of old batteries.
8. Fejlfinding
| Problem | Mulig årsag | Løsning |
|---|---|---|
| Skærmen er tom eller svag. | Batterierne er døde eller forkert installeret. | Udskift batterierne med nye, og sørg for korrekt polaritet. |
| Alarmen lyder ikke. | Alarm is not activated or volume is too low (if adjustable). | Ensure the ALARM ON/OFF switch is in the ON position. Check alarm settings. |
| Tidspunktet er forkert. | Time was not set correctly or batteries were removed. | Reset the time following instructions in Section 5.2. |
| Knapperne reagerer ikke. | Midlertidig softwarefejl eller lavt batteri. | Remove and reinsert batteries to reset the unit. Replace batteries if necessary. |
9. Specifikationer
| Feature | Detalje |
|---|---|
| Modelnummer | PQ-31-1EF |
| Mærke | Casio |
| Display Type | Digital |
| Farve | Black (Unit color, display is typically grey/LCD) |
| Strømkilde | Batteridrevet |
| Batteritype | 2 x Lithium Metal batteries |
| Produktmål (B x H) | 8.6W x 5H centimetres |
| Varens vægt | 45.4 gram |
| Særlige funktioner | Alarm, Backlight (LED), Impact Resistance |
| Monteringstype | Bordmontering |
| Indendørs/Udendørs brug | Indendørs |
10. Garanti og support
Casio products are manufactured to high-quality standards and are backed by a manufacturer's warranty. For specific warranty terms and conditions, please refer to the warranty card included with your purchase or visit the official Casio webwebsted for din region.
If you encounter any issues or require technical assistance, please contact Casio customer support through their official website or the contact information provided in your product packaging. Please have your model number (PQ-31-1EF) and proof of purchase ready when contacting support.
Bemærk: Garantibetingelserne kan variere afhængigt af regionen.