
1. Introduktion
This manual provides detailed instructions for the proper installation, operation, and maintenance of your Lanzar RBHTG414 Heritage 600 Watt 4-Channel MOSFET Amplifier. To ensure optimal performance and safety, please read this manual thoroughly before attempting to install or operate the amplifier. Gem denne vejledning til fremtidig reference.
2. Sikkerhedsinstruktioner
Overhold altid følgende sikkerhedsforanstaltninger under installation og drift:
- Disconnect the vehicle's negative battery terminal before beginning any installation work to prevent electrical shorts.
- Sørg for, at alle ledninger er korrekt ført og fastgjort for at forhindre skader fra skarpe kanter eller bevægelige dele.
- Brug passende ledningsføring til strøm- og jordforbindelser som angivet i installationsafsnittet.
- Installer ampOpbevaringsenheden på et sted, der giver tilstrækkelig ventilation for at forhindre overophedning.
- Undgå at montere ampløfteren i områder, der er udsat for fugt eller kraftige vibrationer.
- Forsøg ikke at reparere eller modificere ampselv. Overlad al service til kvalificeret personale.
3. Produktet er slutview
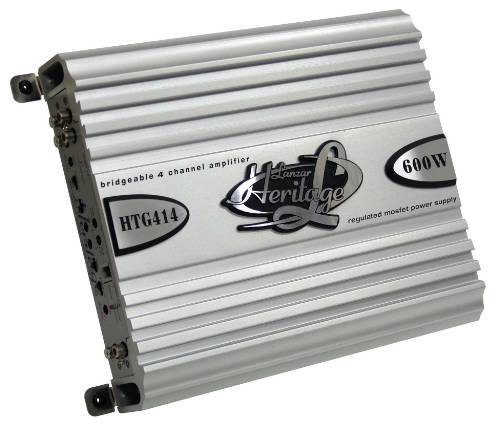
The Lanzar RBHTG414 Heritage amplifier is a 600 Watt, 4-channel MOSFET amplifier designed to deliver powerful and clear audio performance for your car audio system. It features a regulated MOSFET power supply and is bridgeable, offering flexible configuration options for various speaker setups.
4. Opsætning og installation
Korrekt installation er afgørende for din ydeevne og levetid amplifier. The Lanzar RBHTG414 is designed for surface mounting.
4.1 Tjekliste før installation
- Ensure you have all necessary tools and wiring kits (power wire, ground wire, remote turn-on wire, RCA cables, speaker wire, fuses, terminals).
- Choose a mounting location that is dry, well-ventilated, and secure.
- Plan your wiring routes to avoid interference and potential damage.
4.2 Ledningsforbindelser
The following outlines general wiring procedures. Consult a professional installer if you are unsure about any steps.
- Power Connection (BATT+): Connect a heavy-gauge power cable (e.g., 8-gauge or 4-gauge depending on total system power) directly from the vehicle's positive battery terminal to the amplifier's BATT+ terminal. Install an in-line fuse holder within 18 inches (45 cm) of the battery.
- Jordforbindelse (GND): Connect a heavy-gauge ground cable of the same length as the power cable from the ampForbind GND-terminalen på forsyningen til en ren, umalet metaloverflade på køretøjets chassis. Sørg for en solid forbindelse med lav modstand.
- Remote Turn-On (REM): Connect a smaller gauge wire (e.g., 18-gauge) from the ampFjernbetjeningens REM-terminal til fjerntændingsudgangen på din hovedenhed. Denne ledning signalerer amplifter til at tænde og slukke med din bils lydsystem.
- RCA-indgangsforbindelser: Connect RCA audio cables from your head unit's pre-amp udgange til amplifier's RCA input jacks. For 4-channel operation, use two pairs of RCA cables (Front L/R, Rear L/R).
- HøjttalerforbindelserTilslut dine højttalere til ampliferens højttalerudgangsterminaler.
- 4-Channel Stereo Mode: Connect each speaker to its corresponding channel output (e.g., Front Left speaker to CH1+, CH1-, Front Right to CH2+, CH2-, etc.).
- Bridged Mode (2-Channel): For higher power output to subwoofers or a pair of speakers, the RBHTG414 can be bridged. Refer to the amplifier's terminal markings for specific bridged connection points (typically CH1+ and CH2- for one bridged channel, and CH3+ and CH4- for the second). Ensure your speakers are rated for the increased power output in bridged mode.
4.3 Montering
Monter sikkert amplifier to a solid surface using appropriate screws. Ensure there is sufficient space around the amplifier for air circulation, especially around the heat sink fins, to prevent thermal shutdown.
5. Betjeningsvejledning
Når installeret, amplifier will turn on automatically with your head unit. Adjustments should be made carefully to achieve optimal sound quality.
- Få kontrol: The gain control matches the amplifier's input sensitivity to the output level of your head unit. Start with the gain set to minimum, then slowly increase it until you hear distortion, then back off slightly. This is not a volume control.
- Crossover-indstillinger: Hvis din amplifier includes crossover controls (e.g., High-Pass Filter (HPF), Low-Pass Filter (LPF)), adjust them according to your speaker type. HPF is used for full-range speakers to block low frequencies, while LPF is used for subwoofers to block high frequencies.
- Bass Boost: Use the bass boost feature sparingly, if available, as excessive boosting can lead to distortion and potential speaker damage.
6. Vedligeholdelse
Regelmæssig vedligeholdelse er med til at sikre din bils levetid og ydeevne. amplivligere.
- Rensning: Rengør med jævne mellemrum amplifier's exterior with a soft, dry cloth. Ensure the heat sink fins are free of dust and debris to maintain proper cooling.
- Forbindelser: Occasionally check all wiring connections for tightness and corrosion. Loose connections can cause poor performance or damage.
- Ventilation: Sørg for, at amplifier's mounting location remains clear of obstructions that could impede airflow.
7. Fejlfinding
Hvis du oplever problemer med din amplifier, refer to the following common problems and solutions before seeking professional service.
| Problem | Mulig årsag | Løsning |
|---|---|---|
| Ampkøleren tænder ikke | Blown fuse; loose power/ground/remote wire; no power from head unit remote output. | Kontroller sikringen i ledningen og amplifier fuses; verify all power, ground, and remote connections are secure; test remote wire for 12V when head unit is on. |
| Ingen lydudgang | Løse RCA-kabler; forkert forstærkningsindstilling; højttalerledninger frakoblet; amplifer i beskyttelsestilstand. | Check RCA connections at both amplifier and head unit; ensure gain is set correctly; verify speaker wire connections; check for protect light indicator. |
| Forvrænget lyd | Gain set too high; improper crossover settings; damaged speaker; poor ground connection. | Reduce gain setting; adjust crossover filters; inspect speakers for damage; ensure ground connection is solid. |
| Ampkøleren overophedes | Insufficient ventilation; impedance mismatch; prolonged high-power operation. | Sørg for tilstrækkelig luftgennemstrømning omkring amplifier; verify speaker impedance matches amplifier's rating; reduce volume or operating time. |
8. Specifikationer
The following are key specifications for the Lanzar RBHTG414 Heritage Amplivligere:
- Mærke: Lanzar
- Modelnummer: RBHTG414
- Antal kanaler: 4
- Strømudgang: 600 Watts (Peak)
- Amplivligere klasse: MOSFET
- Monteringstype: Overflademontering
- Produktmål (L x B x H): 2 x 2 x 2 tommer
- Varens vægt: 10.89 pund
- UPC: 068888725088
- Farve: BLACK (Unit shown in image is silver, but product data indicates BLACK)
9. Garanti og support
Lanzar products are designed for reliability and performance. For information regarding warranty coverage, technical support, or service, please refer to the warranty card included with your product or visit the official Lanzar website. Please have your model number (RBHTG414) and purchase information ready when contacting support.